The following screens and functions are available to Timekeepers.
Tour of Duty
Accessing an employee’s Tour of Duty information can be performed by one of the following actions:
- Clicking the link in the Tour of Duty column of the Dashboard
- Clicking the link in the Lv.Cat. column of the Dashboard
- Once in the employee’s profile, click the Tour of Duty tab
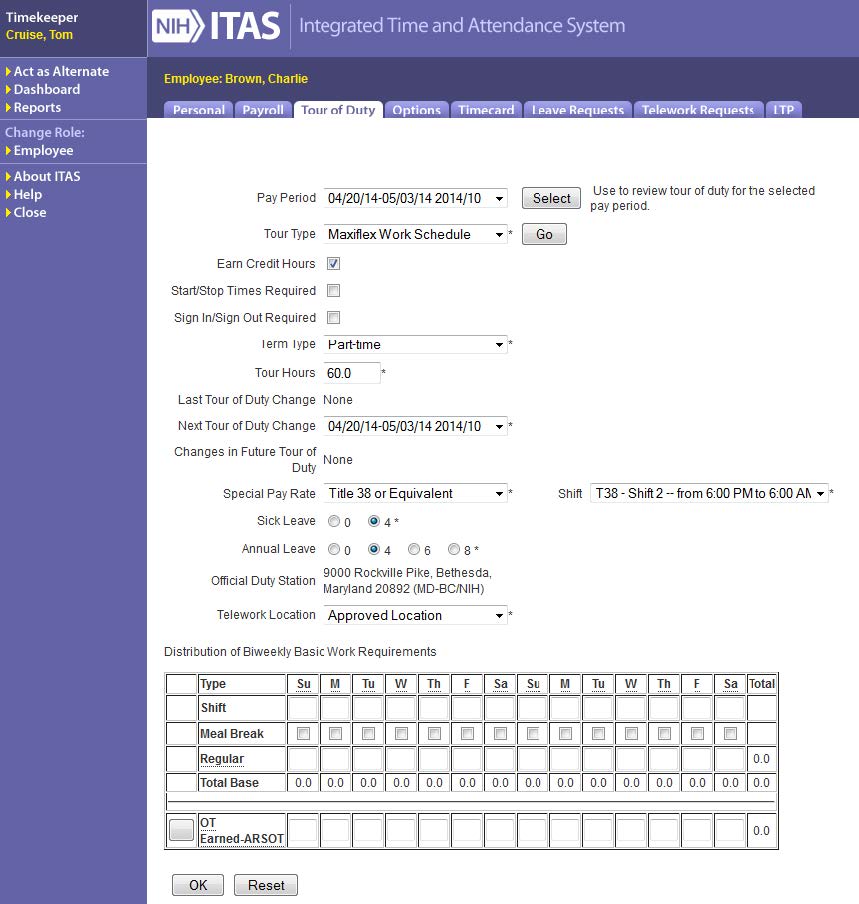
The Tour of Duty screen displays the employee’s Tour of Duty for the current Pay Period. This screen is used to set up all information about the employee’s current and future Tours of Duty.
Note: Core hours are required for organizations that will allow employees to have a Maxiflex tour of duty. Contact the Admin Officer if the Core hours have not been entered for the employee’s organization.
Tour of Duty screen
Steps to display tour information
- Navigate to the Tour of Duty screen
- Select a Pay Period from the list
- Click the Select button
- The screen is refreshed with the Tour information for the selected pay period
Steps to change a tour to Maxiflex (Full-Time) in the current pay period
- Select Maxiflex Work Schedule from the Tour Type list
- Click the Go button
- Optional - Check the Earn Credit Hours checkbox if employee is eligible to earn credit hours
- Optional - Check the Start/Stop Times Required checkbox if employee is required to insert Start and Stop Times into the Timecard
- Click the OK button
- Ensure that the Distribution of Basic Biweekly Work Requirements fields are cleared of all data.
- Click the Timecard tab
- Remove all Regular hours, including Start/Stop times from the timecard
- Click the OK button
Steps to change a tour to a Maxiflex (Part-Time) in the current pay period
- Select Maxiflex Work Schedule from the Tour Type list
- Click the Go button
- Optional - Check the Earn Credit Hours checkbox if employee is eligible to earn credit hours.
- Optional - Check the Start/Stop Times Required checkbox if employee is required to insert Start and Stop times into the Timecard.
- Select Part-Time from the Term Type list
- Set the Tour Hours to less than 80
- Click the OK button
- Ensure that the Distribution of Basic Biweekly Work Requirements fields are cleared of all data.
- Click the Timecard tab
- Remove all Regular hours, including Start/Stop times from the timecard
- Click the OK button
Steps to change a tour to a Maxiflex for a future pay period
- Select the future pay period from the Pay Period list
- Click the Select button
- Select Maxiflex Work Schedule from the Tour Type list
- Click the Go button
- Optional - Check the Earn Credit Hours checkbox if employee is eligible to earn credit hours.
- Optional - Check the Start/Stop Times Required checkbox if employee is required to insert Start and Stop times into the Timecard.
- Select Part-time or Full-Time from the Term Type list
- Set the Tour Hours to the appropriate value
- Click the OK button
- Ensure that the Distribution of Basic Biweekly Work Requirements fields are cleared of all data
Common Maxiflex Tour of Duty validation
- If Timekeeper selects the Maxiflex Work Schedule, but the employee’s Organization does not have Core Hours, the following error message will be displayed: Employee's Organization must have Core Hours in order to use the Maxiflex Tour Type.
- If Timekeeper inserts hours into the Distribution of Biweekly Basic Work Requirements section, the following error message will be displayed: Error! Distribution of Biweekly Basic Work is not allowed for the Maxiflex Tour Type.
- If a Timekeeper switches an employee’s Tour of Duty to Maxiflex during a pay period, the hours from the previous tour will remain in employee’s Timecard. Timecards are only created when pay period is closed and are not automatically updated when an employee’s tour changes within the period.
Timecard
Clicking the link in the Timecards column on the Dashboard or clicking the Timecard tab once in the employee’s profile displays the Timecard. This screen contains information about the current employee and pay period including leave balances, pay hours, and leave used.
The Timekeeper can populate the pay and leave hours, as well as designate telework days for a Maxiflex employee.
ITAS will automatically calculate the total hours when the Start/Stop times are entered on the Timecard Details screen. A 30-minute meal break will be automatically deducted for 8 or more hours of work.
Note regarding meal periods: If you are working more than 5 hours but less than 8 hours, you have the option of an unpaid meal period and, if taken, you must manually adjust your total hours worked for the day by subtracting 30 minutes. Employees working 8 or more hours have a 30 minutes unpaid meal period automatically deducted.
Timecard

Regular Hours Detail screen
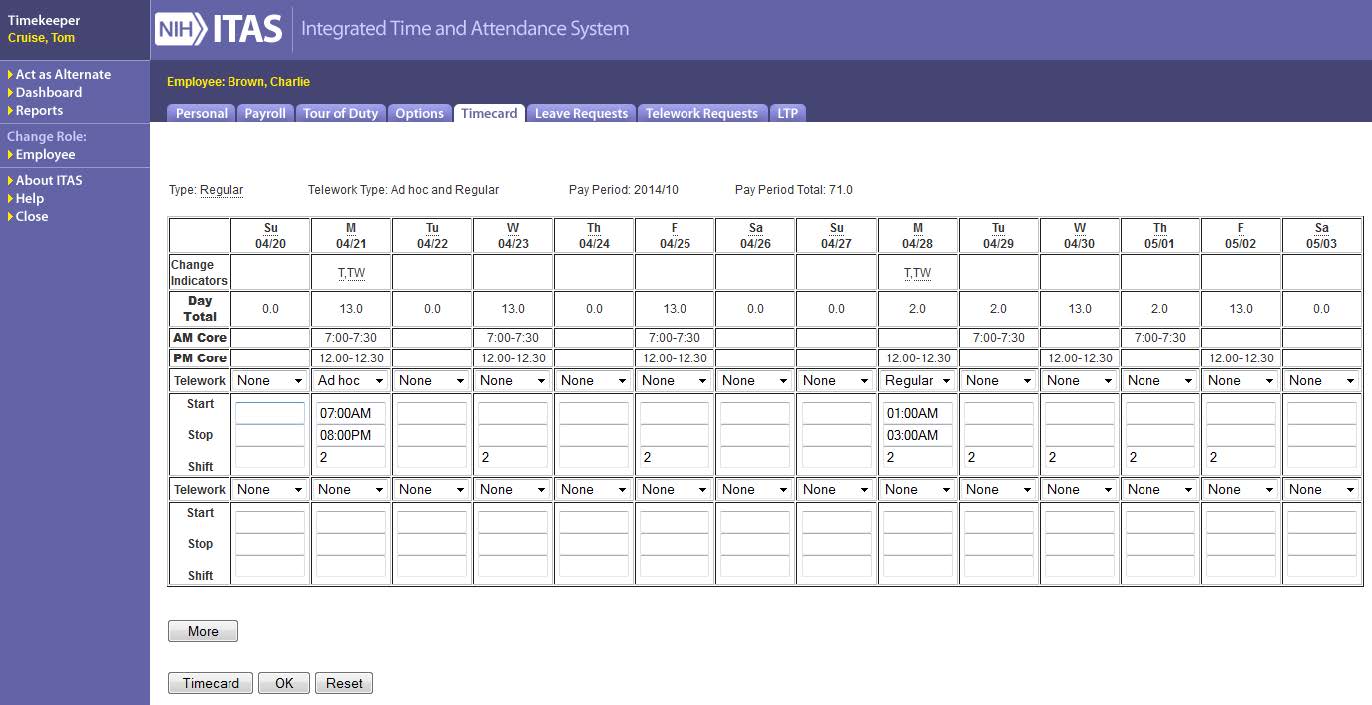
Steps to designate Regular Telework:
- Navigate to the employee’s timecard
- Click the gray box next to Regular
- Select Regular from the Telework dropdown list for a day with Regular hours
- Click the OK button to save changes or the Reset button to clear changes
Steps to designate Ad hoc Telework:
- Navigate to the employee’s timecard
- Click the gray box next to Regular
- Select Ad hoc from the Telework dropdown list for a day with Regular hours
- Click the OK button to save changes or the Reset button to clear changes
Steps to remove Ad Hoc or Regular Telework:
- Navigate to the employee’s timecard
- Click the gray box next to Regular
- Select None from the Telework dropdown list
- Click the OK button to save changes or the Reset button to clear changes
Timecard validation
- If a Timekeeper attempts to enter more than 3 Start/Stop Times on the Regular Hours Details screen, the following error message will be displayed: Error! Employee on Maxiflex tour is allowed up to 3 Start and Stop Times within a 24 hour period.
- If a Timekeeper selects Regular from the Telework list, but has not entered Regular hours for the day, the following error message will be displayed: Error! Please enter Regular hours for the Telework date: MM/DD
- If a Timekeeper selects Ad hoc from the Telework list, the following error message will be displayed: Error! Please enter Regular hours for the Telework date: MM/DD
- If a Timekeeper attempts to insert more than 13 Regular hours to the Timecard for a given day, the following error message will be displayed: Error! Maxiflex employees cannot have more than 13 hours for the workday. If a Timekeeper attempts to insert less than 2 Regular hours to the Timecard for a given day, the following error message will be displayed: Error! Maxiflex employees cannot have less than 2 hours for the workday.
- If a Timekeeper attempts to save the timecard for a full-time employee, with more than 80 hours for a biweekly pay period, the following error message will be displayed: Error! Full-Time Maxiflex tours must be equal to 80 hours per pay period.
Leave Requests
Clicking the link in the Leave Requests column on the Dashboard or clicking the Leave Requests tab once in the employee’s profile displays the Leave Request screen. Requests can be submitted for a past, current or future pay period. Requests can be submitted for a partial day, a full day or multiple days. Multiple types of leave may
be requested for the same day. Individual Leave Requests must be saved before proceeding to the next. An email is automatically sent to the employee’s LAO each time a Leave Request is submitted.
Timekeepers submitting a Leave Request for an employee on a Maxiflex Tour of Duty must include Start Date, Start Time and hours for the selected leave type.
Note: If there are Regular hours on the Timecard, please remove them prior to submitting a full day leave request. Timecard must have Regular hours for a leave request of less than 2 hours.
Leave Request Screen
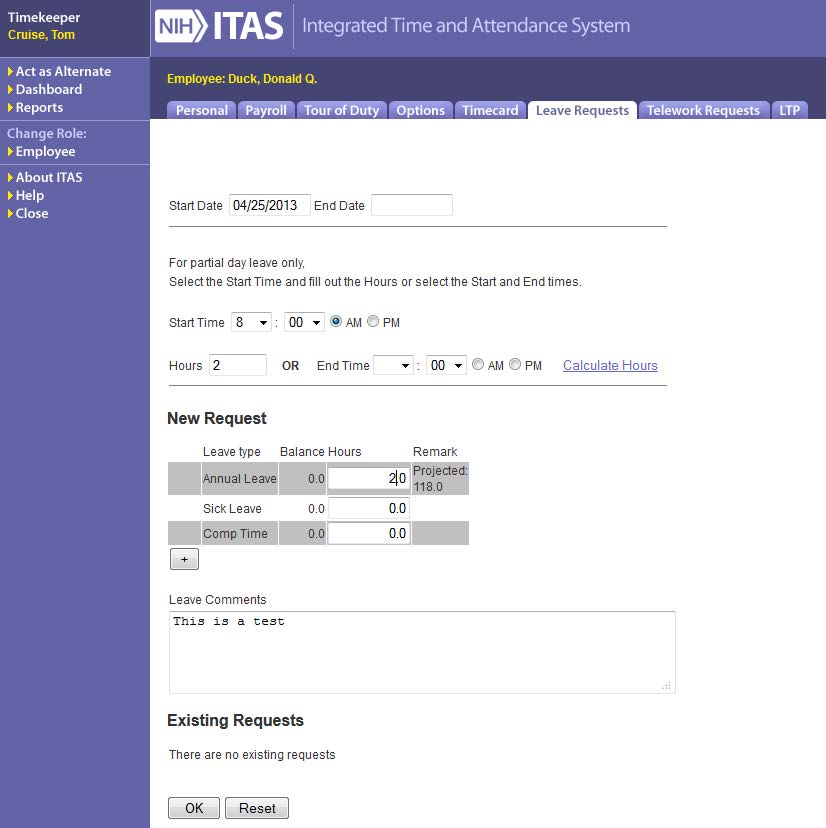
Steps to submit a Leave Request
- Enter the Start Date
- Select the Start Time
- Select the End Time or enter the Number of Hours
- Enter the Hours for the designated Leave type
- Enter a comment if needed
- Click the OK button
Steps to delete existing requests
- Scroll down to the Existing Leave Requests section.
- Check the Delete box next to the request.
- Click the OK button
Common Maxiflex Leave Requests validation
- If a Timekeeper attempts to submit a leave request without a Start Time for, the following error will be displayed: Start time : Enter Start time and hours.
- If a Timekeeper attempts to submit a leave request without an End Time or Hours, the following error message will be displayed: End time: Enter End time and/or hours.
- If a Timekeeper attempts to submit a leave request for more than 13 hours for a single day, the following error message will be displayed: Cannot submit a leave request for more than 13 hours per workday for MM/DD/YYYY
- If a Timekeeper attempts to submit a leave request for less than 2 hours, the following error message will be displayed: Cannot submit a leave request for less than 2 hours per workday for MM/DD/YYYY
- If a Timekeeper submits a Leave Request for an employee on a Maxiflex tour of duty for less than 13 hours, but the request will make the employee’s total tour hours exceed the 80 hour biweekly maximum, the employee’s LAO will not be able to approve the Leave Request. The employee’s LAO will see the following warning: Leave hours cannot be more than hours worked. The employee’s LAO must deny the Leave Request and the Timekeeper or employee must resubmit a Leave Request for a number of hours that will NOT exceed the 80 hour biweekly maximum.