The following screens and functions are available to all employees when signed on under the Administrative Officer (AO) role. The same screens and functions are available when you are “Acting As” an alternate AO.
Dashboard
Clicking the Dashboard link on the left navigation area displays the Dashboard screen. This screen serves as an entry point to all of the screens that pertain to the employees and contractors for whom you are responsible. Each column displays the relevant information and is an active link to the screen associated with that information. The Dashboard also has buttons to generate selected reports.
AO Dashboard screen
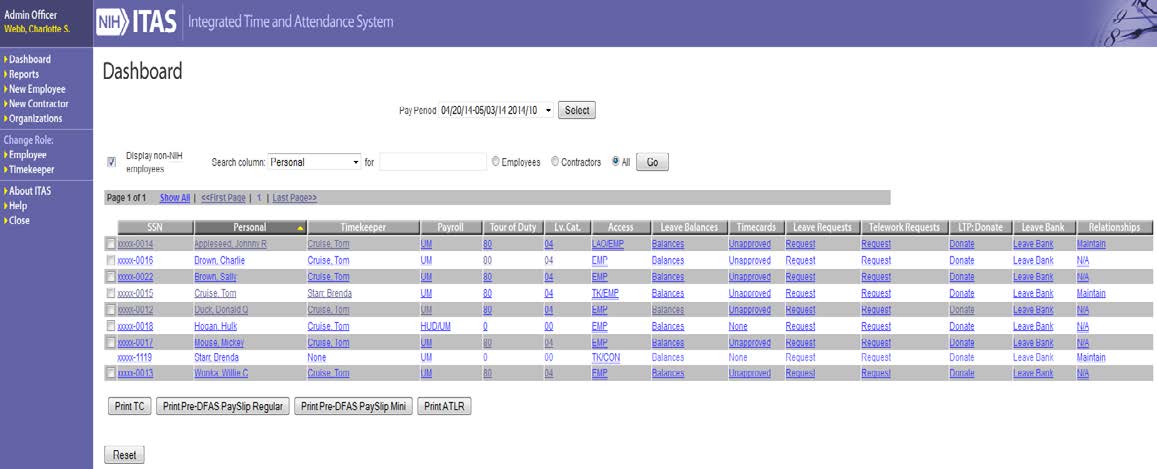
AO Dashboard screen field descriptions
| Label | Values / Actions | Description |
|---|---|---|
| Pay Period | Select | Select the pay period you would work with. |
| Select | Click | Displays Dashboard information for the selected Pay Period. |
| Display non-NIH employees | Check Box | Displays non-NIH employees in the dashboard list. |
| Search Column | Select Column Name | Select a Column Name to search. |
| For | Search value | Freeform text to find. |
| Employees Radio Button | Click | Filter which displays only Federal Employees |
| Contractors Radio Button | Click | Filter which displays only Non-Federal staff - Contractors |
| All Radio Button | Click | Displays the entire dashboard list |
| GO Button | Click | Search the selected column for the value entered. |
| Show All | Link | Click to show all employees on one page. |
| << First Page | Link | Click to show the first page of employees if multiple pages. |
| 1, 2, ... | Link | Click to show a specific page of employees. |
| Last Page >> | Link | Click to show the last page of employees |
| Check Box | Select for reports at the bottom of the screen. Not valid for Contractors. | |
| SSN | Last 4 digits of SSN or Badge ID | Click to go to the Personal screen. |
| Personal | Name | Click name to go to the Personal screen. |
| Timekeeper | TK name fo associated employee | Click name to go to the Personal screen. Displays 'None' for Contractors. |
| Payroll | SAC code for employee | Click SAC code to go to Payroll screen. |
| Tour of Tudy | Number of regular tour hours | Click tour hours to got oTour of Duty screen. Not valid for Contractors. |
| Lv. Cat. | Number of Annual Leave hours accrued per pay period | Click Lv. Cat. Hours to go to Tour of Duty screen. Not valid for Contractors. |
| Access | ITAS access levels (roles) for the employee or contractor | Click Access to go to Options screen. |
| Leave Balances | Balances | Click to go to the Leave Balances screen. Not valid for Contractors. |
| Timecards | Shows timecard status for the selected pay period and associated employee | Click to go to Timecard (TC) screen. Not valid for Contractors. |
| Leave Requests | Shows whether leave has been requested. | Click to go to the Leave Requests screen. Not valid for Contractors. |
| Telework Requests | Shows whether ad hoc telework has been requested and/or approved for the pay period | Displays if Employee is eligible for Ad hoc Telework. Click to go to the Telework Request screen. Not valid for Contractors. |
| LTP:Donate | Displays Donate | Click to go to the LTP screen. Not valid for Contractors. |
| Leave Bank | Displays Leave Bank. | Click to go to the Leave Bank Screen. Not valid for Contractors. |
| Relationships | Displays Maintain if there is an existing relationship or N/A if not | Click to go to the Relationships screen. |
| Print TC | Button / Click | Shows the TC in a printable format. |
| Print Pre-DFAS PaySlip Regular | Button / Click | Shows the regular Pre-DFAS PaySlip. |
| Print Pre-DFAS PaySlip Mini | Button / Click | Shows the Pre-DFAS PaySlip Mini. |
| Print ATLR | Button / Click | Shows the ATLR Report. |
| Reset | Button / Click | Standard function. |
Set the current pay period
- Select the pay period from the dropdown.
- Click Select.
- The screen is refreshed with information from the selected pay period.
Display non-NIH employee (LTP Donors/Recipients) in the Dashboard list
- Check the box
- Click Go.
- The screen is refreshed with the non-NIH employees displayed.
Search for a specific value in a column
- Select the column name from the dropdown.
- Enter the value to search in the “For” text box.
- Click Go.
- The screen is refreshed with the page where the searched for data is found.
Go to specific screens
- Click on the value associated with the screen and employee (see table above).
- The requested screen is displayed.
Generate reports
- Select employees to report by clicking the check box next to their name(s).
- Click the button with the associated report at the bottom of the screen.
- The requested report is displayed in a new browser window.
Clear selected employees
- Click Reset.
Personal
Accessing an employee or contractor’s Personal information can be performed by one of the following actions:
- Clicking the employee’s SSN in the SSN column of the Dashboard
- Clicking the employee’s name in the Personal column of the Dashboard
- Clicking the Timekeeper’s name in the Timekeeper column of the Dashboard
- Clicking the Personal tab once in the employee’s profile
The Personal screen for the employee is used to change the employee’s basic information that is stored in ITAS. Note that this information is not pay period specific.
AO Personal screen for Federal Employees
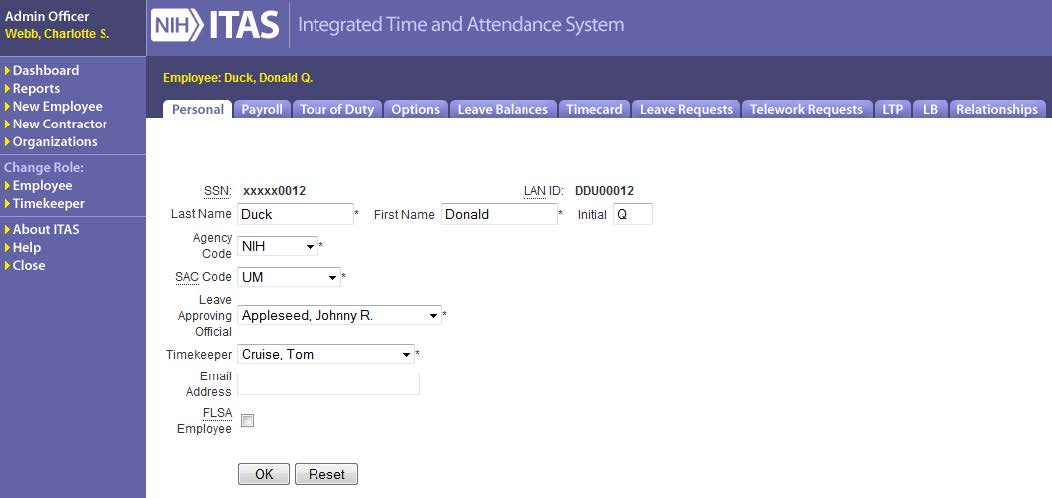
Change an employee’s personal information
- From the dashboard, click a link in the appropriate column.
- Overtype information or make a selection from one of the dropdown lists.
- Click OK to save changes or Reset to ignore.
AO Personal screen for Contractors
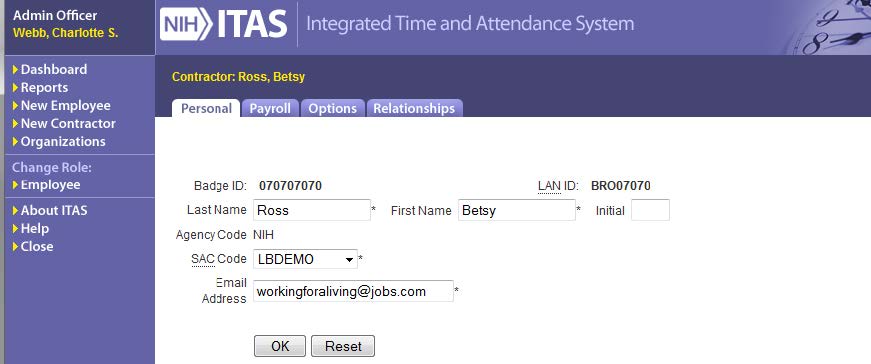
Accessing a contractor’s Personal information can be performed by one of the following actions:
- Clicking the contractor’s Badge ID in the SSN column of the Dashboard
- Clicking the contractor’s name in the Personal column of the Dashboard
- Clicking the Personal tab once in the employee’s profile
The Personal screen for the contractor is used to enter or alter the contractor’s basic information that is stored in ITAS.
Note: Email Address is required for contractors and this information is not pay period specific.
Payroll
Clicking the value in the Payroll column of the Dashboard or clicking the Payroll tab, displays the Payroll scree for the selected employee and pay period. This screen is used to change the employee’s information specific to pay and service dates. Individual field values are explained in the table below.
AO Payroll screen for Federal Employees
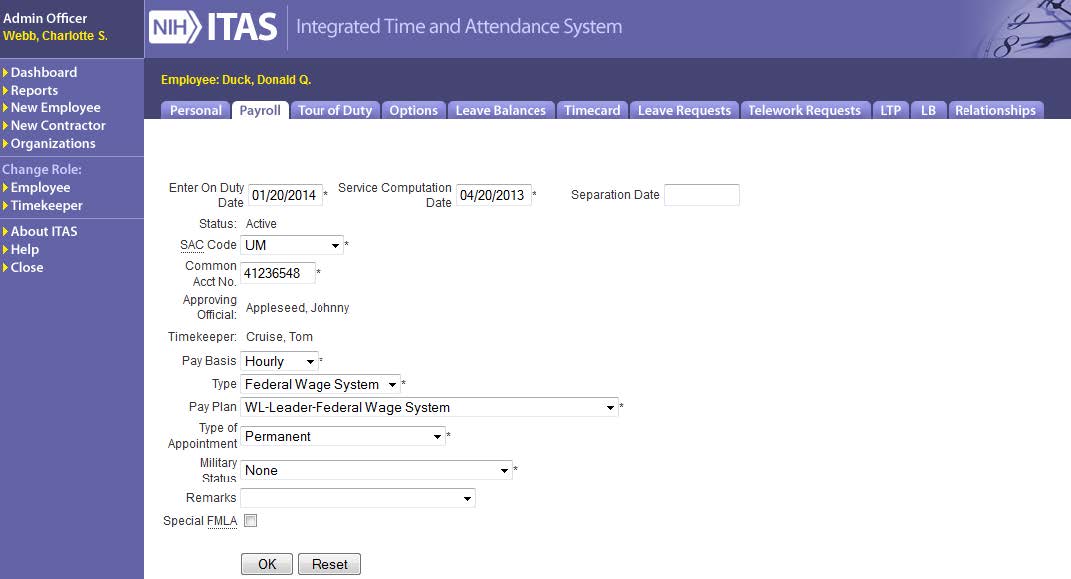
AO Payroll Screen field descriptions for Federal Employee
| Label | Values / Actions | Description |
|---|---|---|
| Enter On Duty Date | Valid date | The effective date of the employee's appointment. |
| Service Computation Date | Valid date | Service Computation Date - used to calculate the employee's annual leave category, except for SES employees. |
| Separation date | Valid date or blank | Date the employee was no longer employed at NIH. |
| Status | Display Only | Active or Separated |
| SAC Code | Select SAC Code | Standard Accounting Code |
| Common Acct No | Enter CAN Code | 8-digit account number associated with the current fiscal year. |
| Approving Official | Display only | Assigned on Personal screen. |
| Timekeeper | Display only | Assigned on Personal screen. |
| Pay Basis | Select Pay Basis | The period of time for which the employee's salary is calculated. |
| Type | Select Pay Type | The Federal employment system of pay for which the employee is assigned. |
| Pay Plan | Select Pay Plan | The employee's pay plan which is correlated to the employee's Pay Type. |
| Type of Appointment | Select Type of Appointment | Check against other pay and appointment fields. Only certain combinations are valid. |
| Military Status | Select Military Status if applicable | Denotes the EMP's military status. |
| Remarks | Select when separating | Standard remarks for separation reason, |
| Special FMLA | Check Box | Grants employee an additional 26 weeks of FMLA leave. |
| OK | Button / Click | To accept changes. |
| Reset | Button / Click | To ignore unapplied changes and re-display the current information. |
Change an employee’s payroll information
- On the dashboard, find the appropriate employee and click on the Payroll information to display the Payroll screen.
- Overtype and/or make a selection from the dropdown lists.
- Click OK to save changes or Reset to ignore.
Note: The Create Balances button is displayed only if all of the following conditions are true:
- Employee does not have balance records for the current pay period
- Employee is active
- Employee is not a Commissioned Corps Officer
AO Payroll screen for Contractors
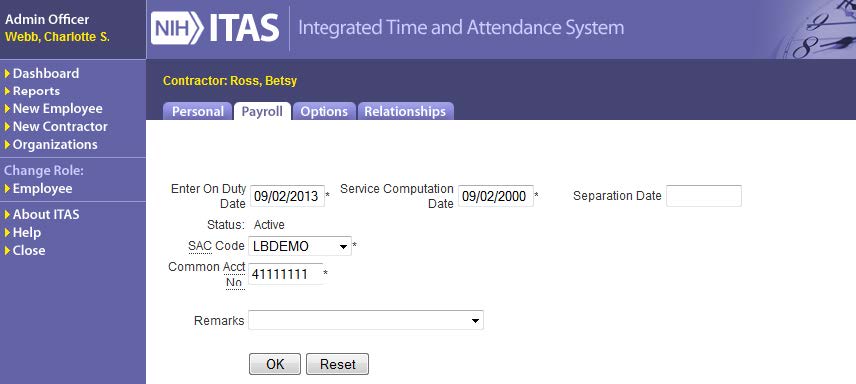
AO Payroll Screen field descriptions for Contractors
| Labels | Values / Actions | Description |
|---|---|---|
| Enter On Duty Date | Valid Date | The effective date for which the Contractor may begin to use ITAS. |
| Service Computation Date | Valid Date | Service Computation Date. |
| Separation Date | Valid date or blank | Date the contractor was no longer employed at NIH. |
| Status | Display Only | Active or Separated |
| SAC Code | Select SAC Code | Standard Accounting Code |
| Common Acct No | Enter CAN Code | 8-digit account number associated with the current fiscal year. |
| Remarks | Select when separating | Standard remarks for separation reason. |
| OK | Button / Click | To accept changes. |
| Reset | Button / Click | To ignore unapplied changes and re-display the current information. |
Change a contractor’s payroll information
- On the dashboard, find the appropriate contractor and click on the Payroll information to display the Payroll screen.
- Overtype and/or make a selection from the dropdown lists.
- Click OK to save changes or Reset to ignore.
Tour of Duty
Accessing an employee’s Tour of Duty information can be performed by one of the following actions:
- Clicking the value in the Tour of Duty column of the Dashboard
- Clicking the value in the Lv.Cat. column of the Dashboard
- Clicking the Tour of Duty tab once in the employee’s profile
The Tour of Duty screen displays the employee’s Tour of Duty for the current Pay Period. This screen is used to set up all information about the employee’s current and future Tours of Duty.
Tour of Duty screen
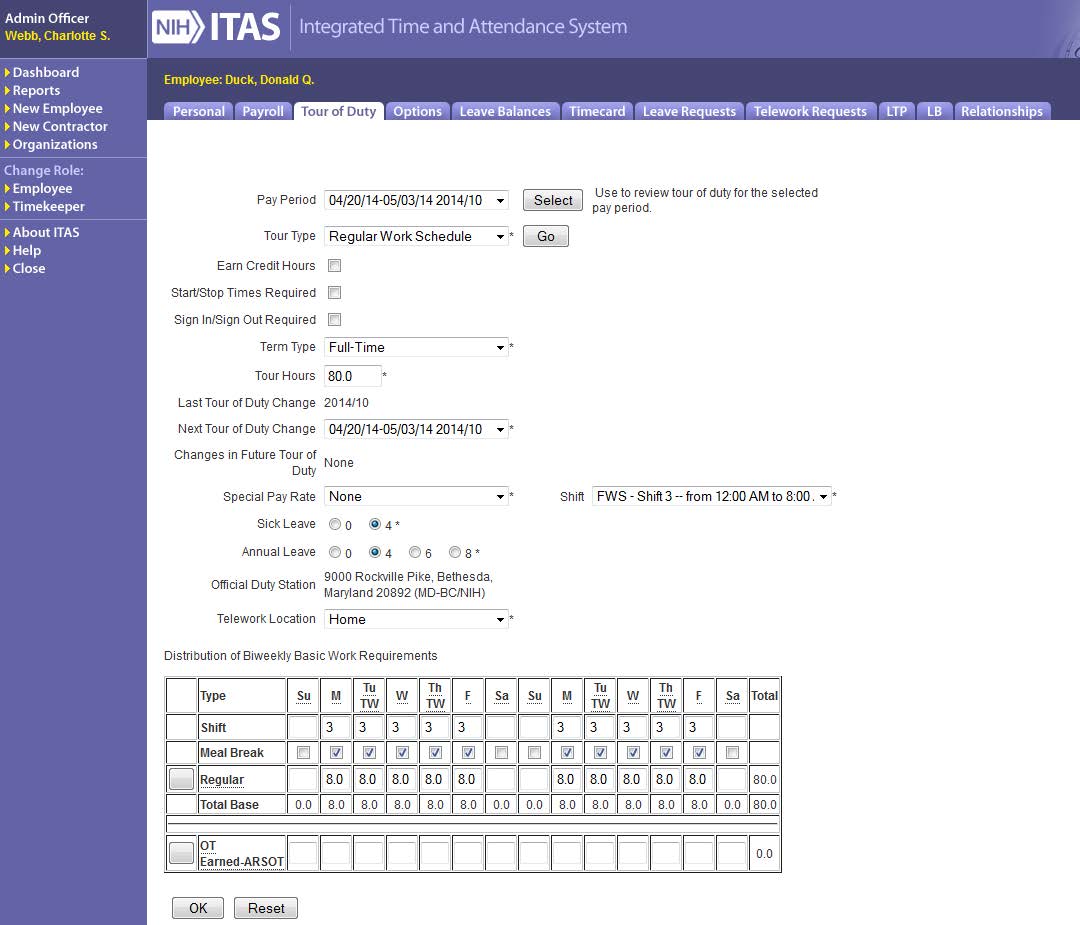
AO Tour of Duty Screen field descriptions
| Label | Values / Actions | Description |
|---|---|---|
| Pay Period | Select Pay Period | Select the pay period for which you would like to review the Tour. |
| Select Button | Click | Displays Tour information for the selected Pay Period. |
| Tour Type | Select Tour Type | This shows the valid Tour Types. Not all will be available for all employees |
| GO | Button / Click | Refreshes the screen with information based on the selected Tour Type. Note that if you don’t click this after selecting a different tour, other entries in the screen may not be valid and may cause confusing errors. |
| Earn Credit Hours | Checkbox | Check this box to request to be able to earn Credit Hours. Checked against Tour Type to see if Credit Hours can be earned. |
| Start / Stop Times Required | Checkbox | The check box will inform employees if they are required to insert Start and Stop times into their Timecard as part of the Maxiflex tour. |
| Sign In / Sign Out Required | Display Only | The check box was intended for use with the Maxiflex Tour Type, but was deemed unnecessary |
| Term Type | Select Term | Usually Full Time, Part Time, or Intermittent. Checked against the Tour Type to see if the combination is valid. |
| Tour Hours | Valid Number | Shows the default number of hours for the selected Tour. |
| Last Tour of Duty Change | Display only | Shows the last year and pay period a Tour change was done or the current year and pay period the pending change is due. |
| Next Tour of Duty Change | Select | Shows the year and pay period the requested change will be applied. |
| Changes in Future Tour of Duty | Display only | Shows the year and pay period of a future scheduled Tour change, if any |
| Special Pay Rate | Select | Usually NONE, valid for certain Tour Types. |
| Shift | Select | Usually Regular, valid for certain Tour Types. |
| Sick Leave | Click on 0 or 4 | Shows the number of hours Sick Leave accrued per pay period. |
| Annual Leave | Click on 0, 4, 6, or 8 (0, 7, 11 or 14 for firefighters) | Shows the number of hours Annual Leave accrued per pay period. |
| Official Duty Station | Information Only | Official Duty Location for non-Telework tour days. |
| Telework Location | Select | Location where Telework will be performed. (Field will only be displays if Employee is eligible for Telework.) |
| Distribution of Biweekly Basic Work Requirements Table | ||
|---|---|---|
| Meal Break | Checkbox | Indicates whether a meal break is required. |
| (Regular) Zoom | Button / Click | Shows the Hours Detail screen for the Regular Tour hours. |
| (Regular) Hours | Hours | Enterable to show the number of hours for each type and day. |
| (OT Earned - ARSOT) | Button / Click | Shows the Hours Detail Screen for the OT Earned - ARSOT hours. |
| (OT - Earned ARSOT) Hours | Hours | Enterable to show the number of hours for each type and day. |
| OK | Button / Click | To accept changes. |
| Reset | Button / Click | To ignore unapplied changes and re-display the current information. |
| Create Leave Balances | Button / Click | If shown, this will create a current Leave Balances record for the employee. If not shown it means the Leave Balances have already been created. |
| Create Timecard | Button / Click | Only displayed if there is no timecard (TC) for the selected employee and pay period. Click to create the TC. |
Note: The type of hours displayed in the Distribution of Biweekly Basic Work Requirements Table is dependent on the type of employee and tour of duty.
Display Tour Information
- Navigate to the Tour of Duty screen.
- Select a Pay Period from the dropdown.
- Click Select.
- The screen is refreshed with the Tour information as of the selected pay period.
Change a Tour of Duty
- Display Tour Information for the effective pay period.
- Select the new Tour Type.
- Click GO to pre-fill the rest of the screen with information specific to the selected Tour Type.
- Select Term Type.
- Update Tour Hours if needed.
- Select the pay period to change the tour from the Next Tour of Duty Change.
- Verify or select the Special Pay Rate.
- Verify or select the Shift.
- Select Telework Location if the tour change is for Telework.
- Verify or change the Meal Breaks. Maxiflex employees should not select Meal Breaks.
- Click the (Regular) button to show the Hours Detail (Regular) screen for hours and verify or change the hours. Employees that currently have Regular Telework will need to access the Hours Detail (Regular) screen and select the Telework days again. If tour change is for a Maxiflex tour, do not insert values into Hours Detail (Regular) or summary screen.
- Click the (OT Earned – ARSOT) button to show the Hours Detail (Other) screen for hours and
- verify or change the hours. Employees that currently have Regular Telework will need to access
- the Hours Detail (Other) screen and select the Telework days again. If tour change is for a
- Maxiflex tour, do not insert values into Hours Detail (Other) or summary screen.
- Enter comments if needed.
- Click OK.
There are many rules and dependencies on the combinations of entries you can make on this screen. If the change is not accepted, please check the error message at the top of the page and make corrections as indicated.
Note: The Create Timecard button is displayed only if all of the following conditions are true:
- Current pay period is selected
- Employee does not have a timecard
- Employee is active and not separated
- Employee is not Commissioned Corps Officer
Regular Hours Detail screen
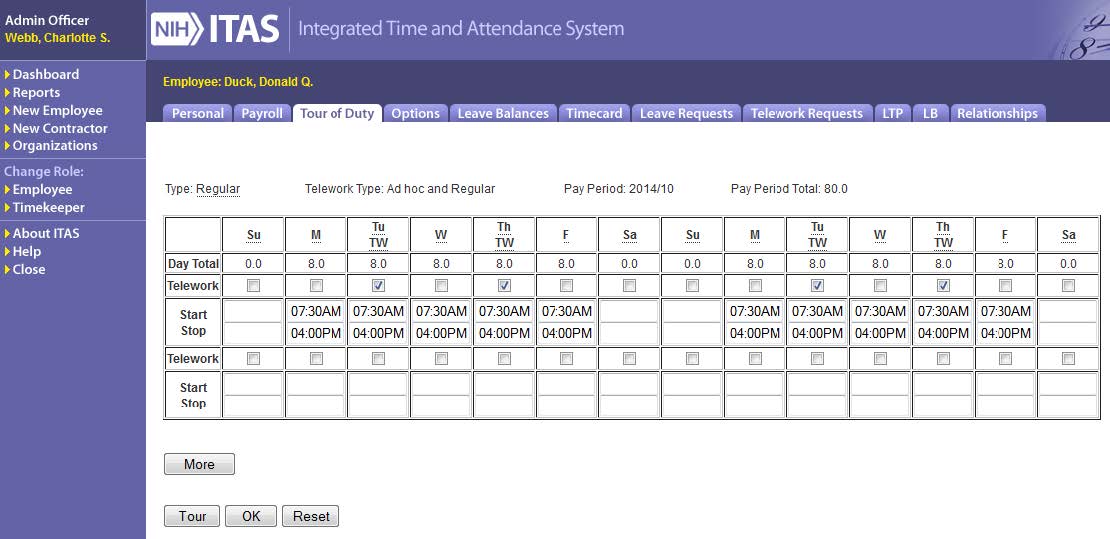
AO Hours Detail Screen field descriptions
| Label | Values / Actions | Description |
|---|---|---|
| Type | Information Only | Displays the Type of hours for the Day, Start, and Stop times. |
| Pay Period | Information Only | Displays the pay period of the Tour. |
| Pay Period Total | Information Only | Displays the total number of hours for the Type and Pay Period. |
| Day Total | Information Only | Displays the total number of hours for the specific day, type, and pay period. For Regular Hours only, these hours do not include meal breaks. |
| Telework | Checkbox | Denotes that the following Start/Stop times for a given day are for Telework scheduled as part of the tour of duty. (Won’t appear if user does NOT have Regular Telework access.) |
| Start | Time | Standard time entries that can be changed to account for the Day Total number of hours. |
| Stop | Time | Standard time entries that can be changed to account for the Day Total number of hours. |
| More | Button / Click | If first two Start and Stop times for a given day are filled in this button will create another Start and Stop time. |
| Tour | Button / Click | Click to return to the main Tour Of Duty screen. |
| OK | Button / Click | To accept changes. |
| Reset | Button / Click | To ignore unapplied changes and re-display the current information. |
Change Tour Hours
- Change the Start and or Stop times to show the actual anticipated times for each Tour day.
- The Stop time minus the Start time, plus the meal break must equal the number of hours in the Day Total. In the above example there is a 30 minute meal break included in each day.
- Click “More” if needed to show another row of Start and Stop times if needed to show nonconsecutive hours.
- Enter the Shift if applicable
- Click OK.
Options
Clicking a value in the Access column of the Dashboard or clicking the Options tab, displays the Options screen for the desired Federal employee or contractor. This screen is used to set the employee’s access levels or available roles.
AO Options screen for Federal Employees
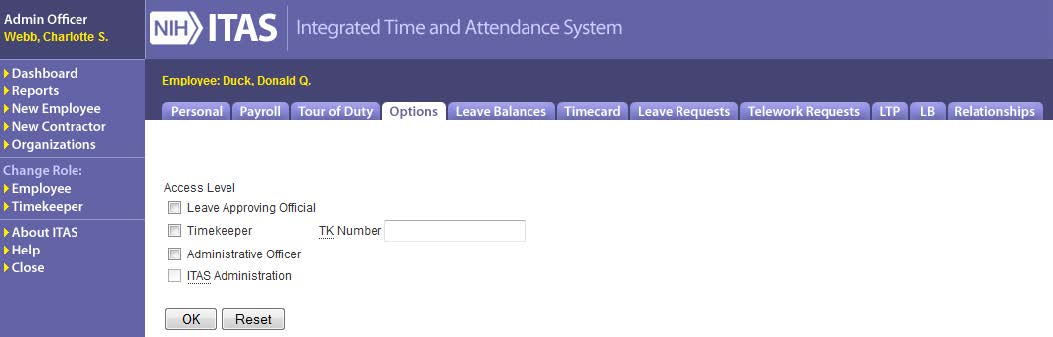
AO Options Screen field descriptions for Federal Employees
| Label | Values / Actions | Description |
|---|---|---|
| Leave Approving Official | Checkbox | Check to set the employee as an LAO. |
| Timekeeper | Checkbox | Check to set the employee as a TK. |
| TK Number | Valid TK Number | Must be entered and valid five-digit value to set as TK or cleared to remove TK privileges. |
| Administrative Officer | Checkbox | Check to set employee as an AO. |
| ITAS Administration | Checkbox - Read Only | Checked in read-only mode to display if employee has IA privileges. |
| OK | Button / Click | Validates changes and applies updates, if no errors are found. |
| Reset | Button / Click | Ignores changes and redisplays the screen. |
Change an employee’s access level (role)
- Navigate to the Options screen.
- Check or uncheck boxes as necessary.
- Enter TK Number if setting employee as a TK.
- Click OK button to accept changes or Reset button to clear changes.
Note: If removing the TK or LAO privilege, there can be no employees assigned to the selected TK or LAO.
AO Options screen for Contractors
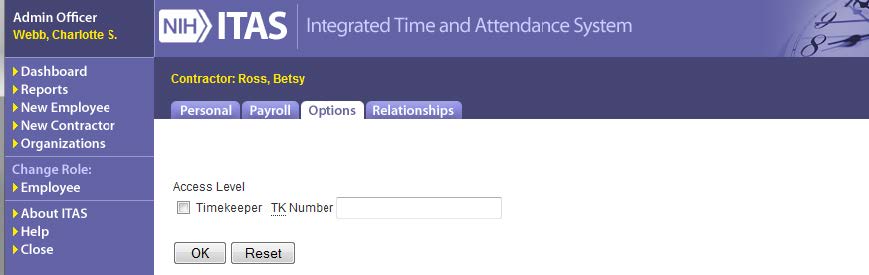
AO Options Screen field descriptions for Contractors
| Label | Values / Actions | Description |
|---|---|---|
| Timekeeper | Checkbox | Check to set the contractor as a TK. |
| TK Number | Valid TK Number | Must be entered and valid five digit value to set as TK or cleared to remove TK privileges. |
| OK | Button / Click | Validates changes and applies updates, if no errors are found. |
| Reset | Button / Click | Ignores changes and redisplays the screen. |
Note: If removing the TK or LAO privilege, there can be no employees assigned to the selected TK or LAO.
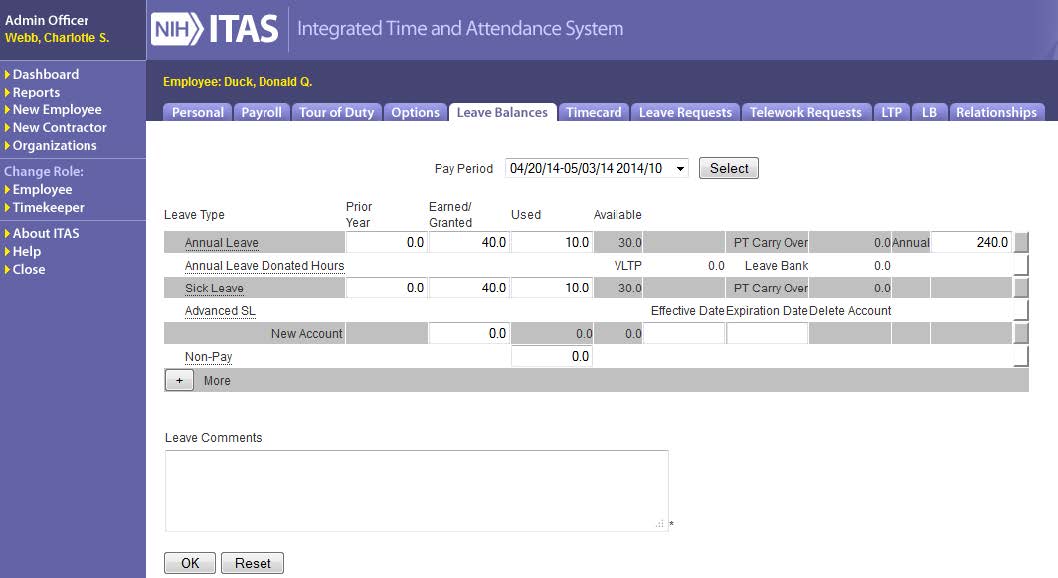
Leave Balances
Clicking a value in the Leave Balances column of the Dashboard or clicking the Leave Balances tab, displays the initial Leave Balances screen for the employee. This is used to verify and/or adjust an employee’s available leave.
Leave Balances screen, initial view
Leave Balances screen, expanded
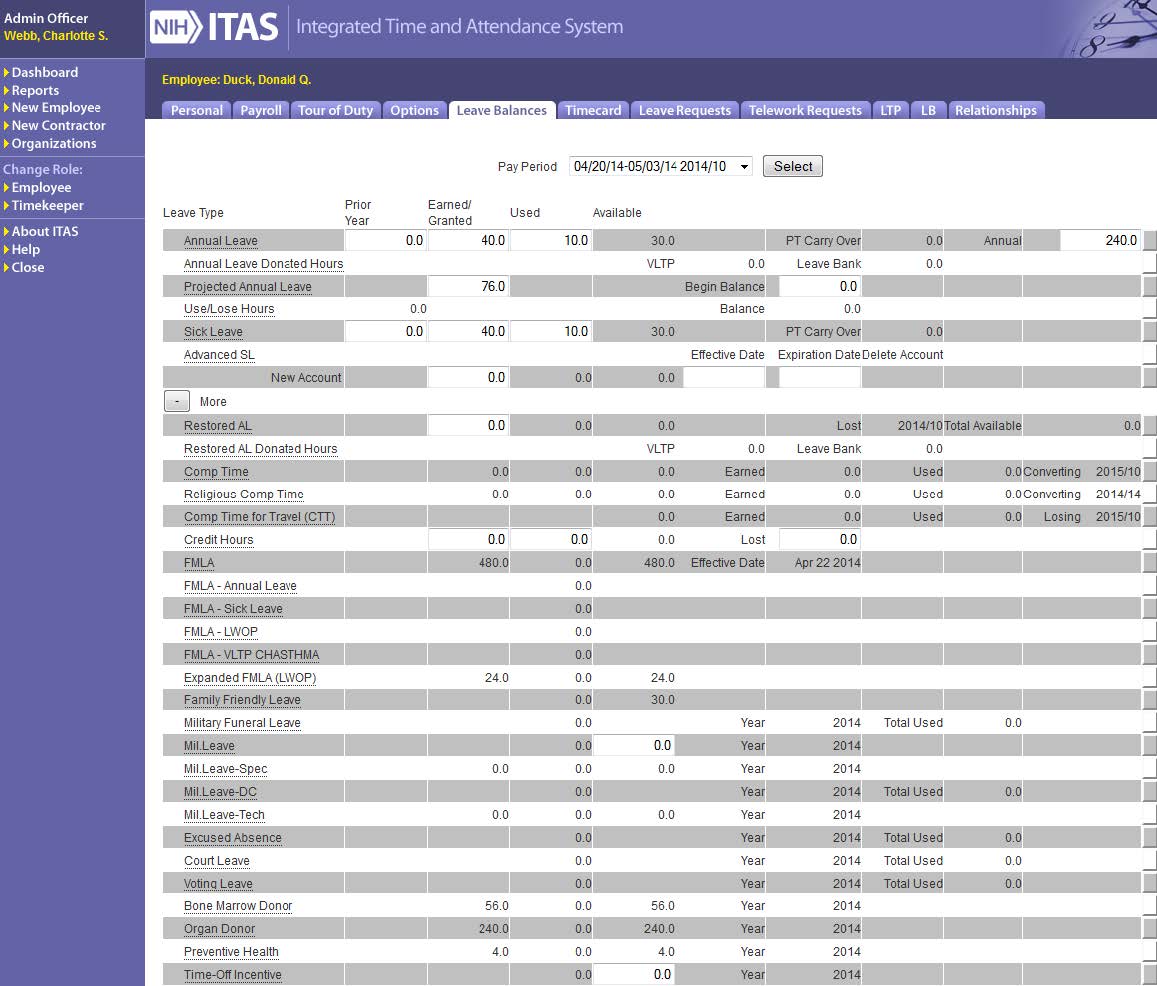
Verify leave balances
- Navigate to the Leave Balances screen.
- Click on the “+” button to show additional leave types if needed.
Adjust leave balances
- Navigate to the Leave Balances screen.
- Click on the “+” button to show additional leave types if needed.
- Type over values or make selections from dropdown lists to change.
- Enter a comment - required.
- Click OK to save or Reset to clear.
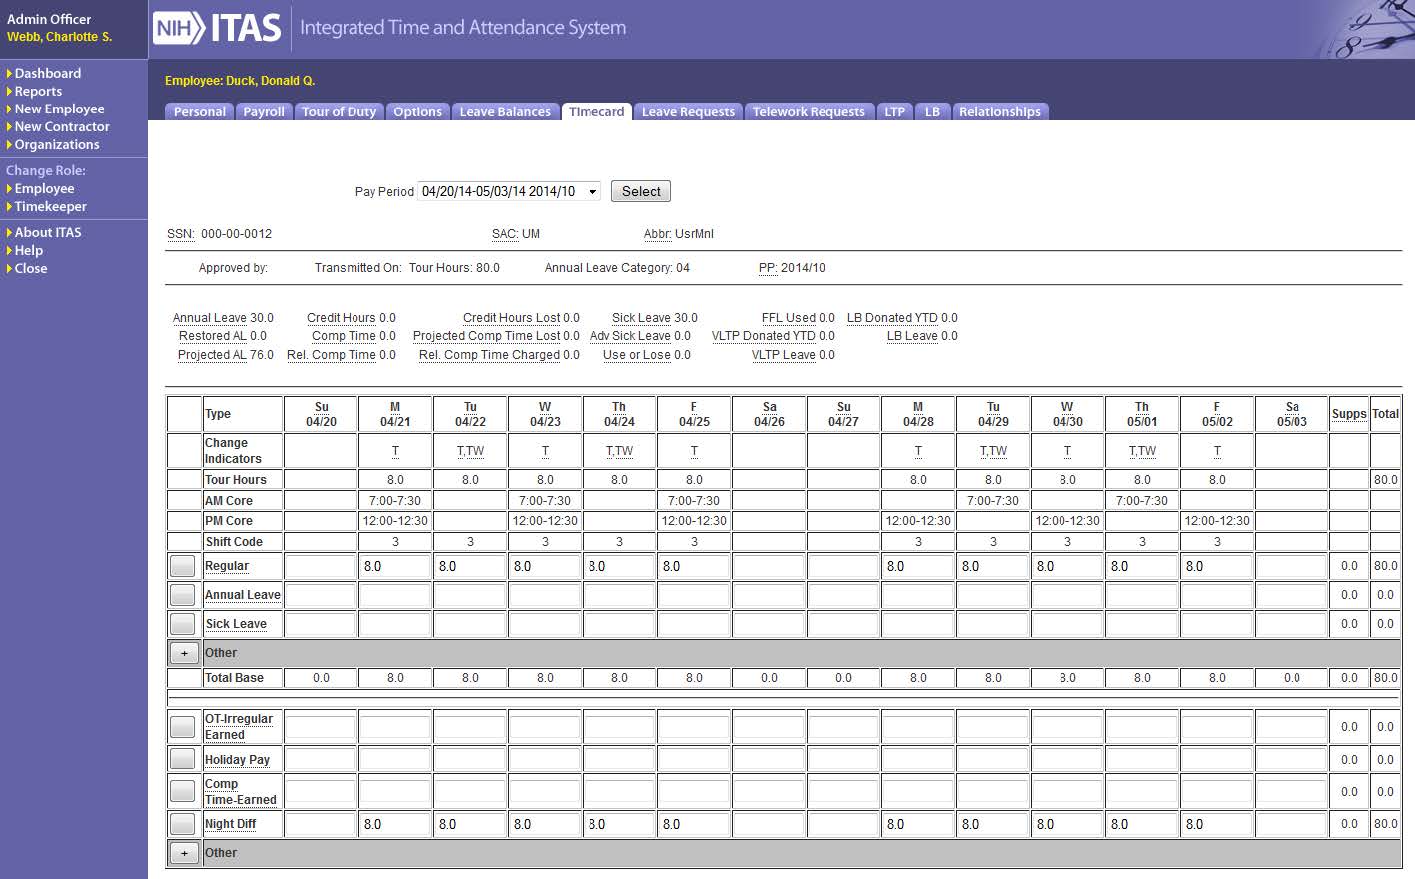
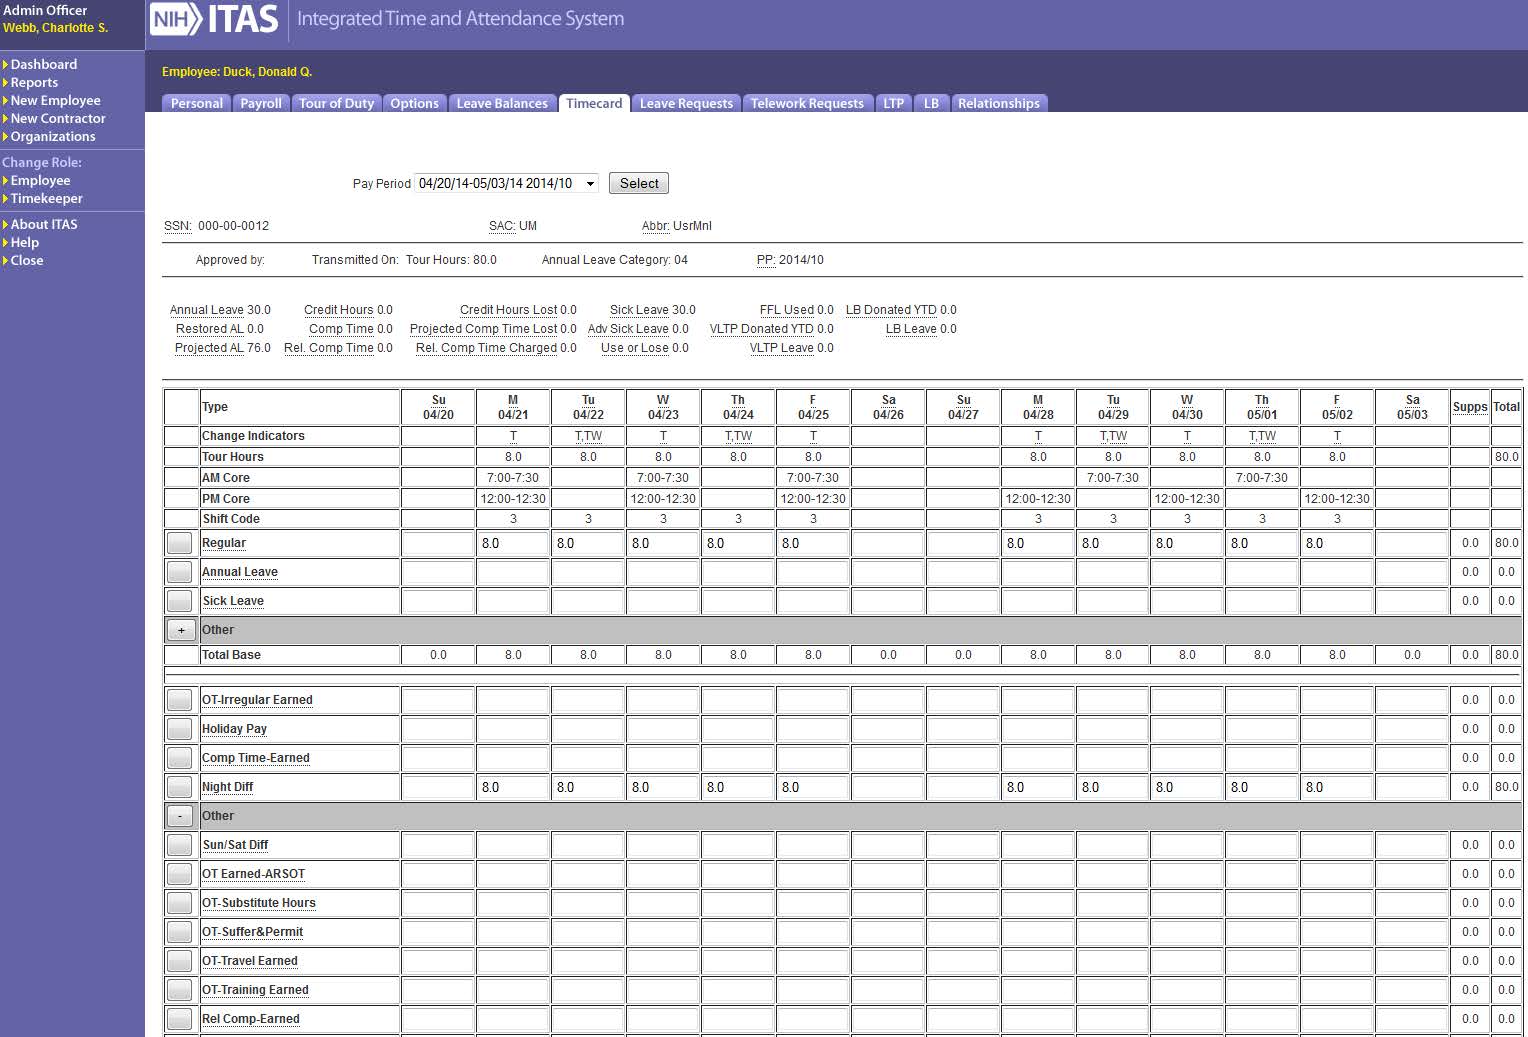
Timecard
Clicking the Timecard tab or the active link on the Dashboard displays the Timecard screen. This screen contains information about the current employee and pay period including leave balances, pay hours, and leave used. The information displayed is outlined in the table after the screen picture.
Timecard screen, initial view
Timecard screen, Leave Types expanded
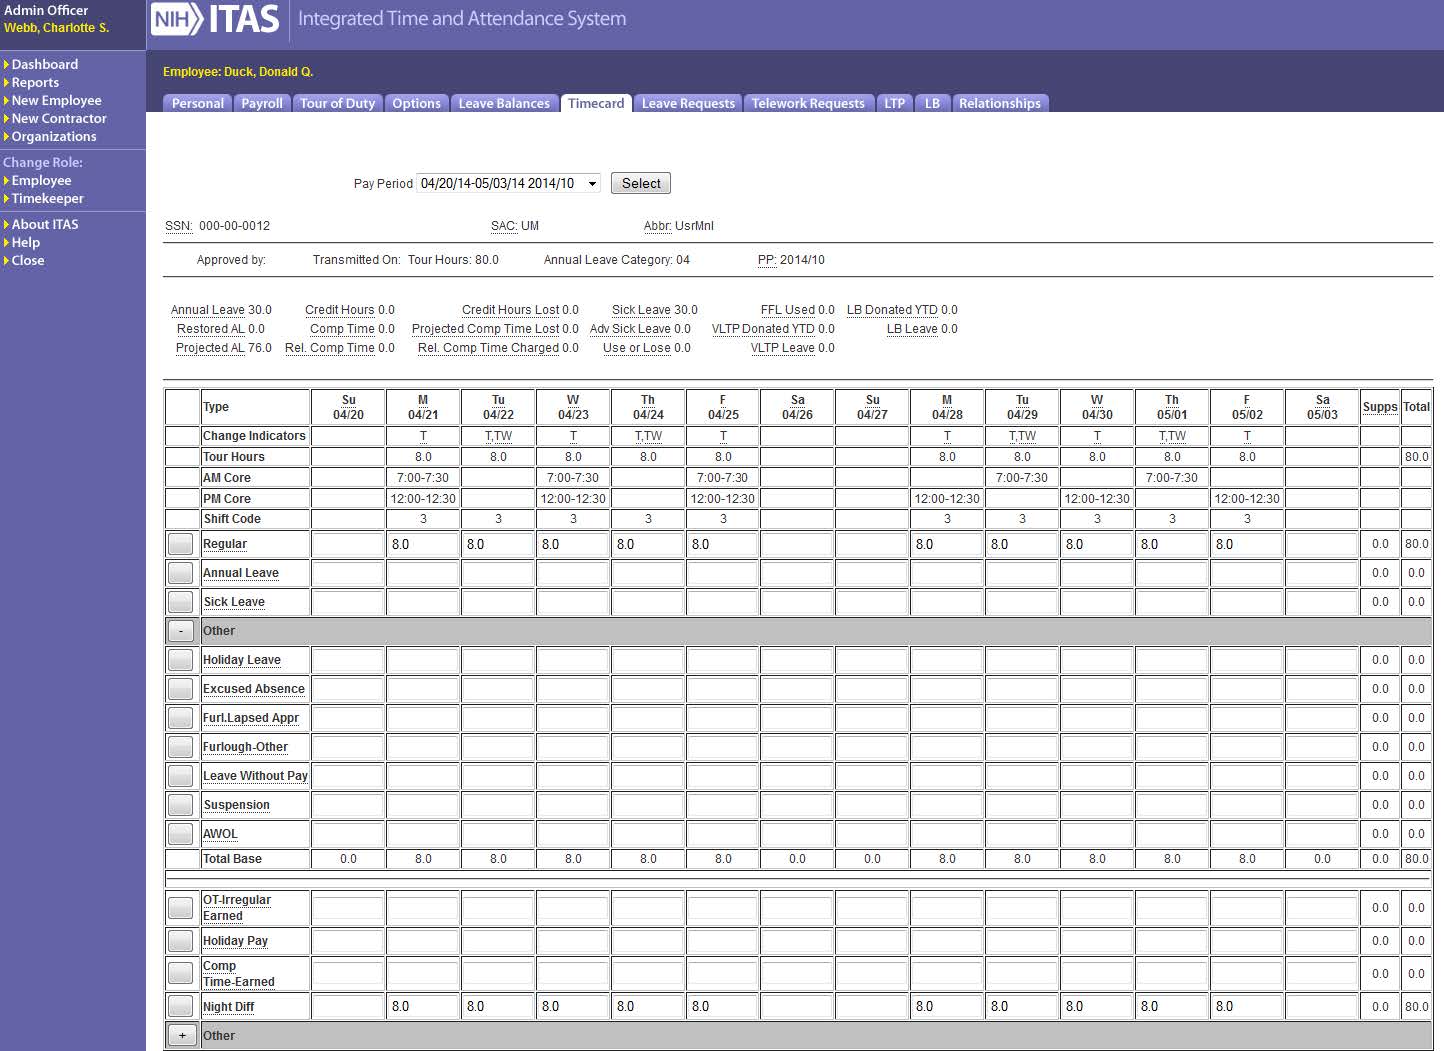
Note: The type of hours and leave displayed on the timecard are dependent on the employee and tour of duty.
Timecard screen, Pay Types expanded
Timecard Hours Detail screen
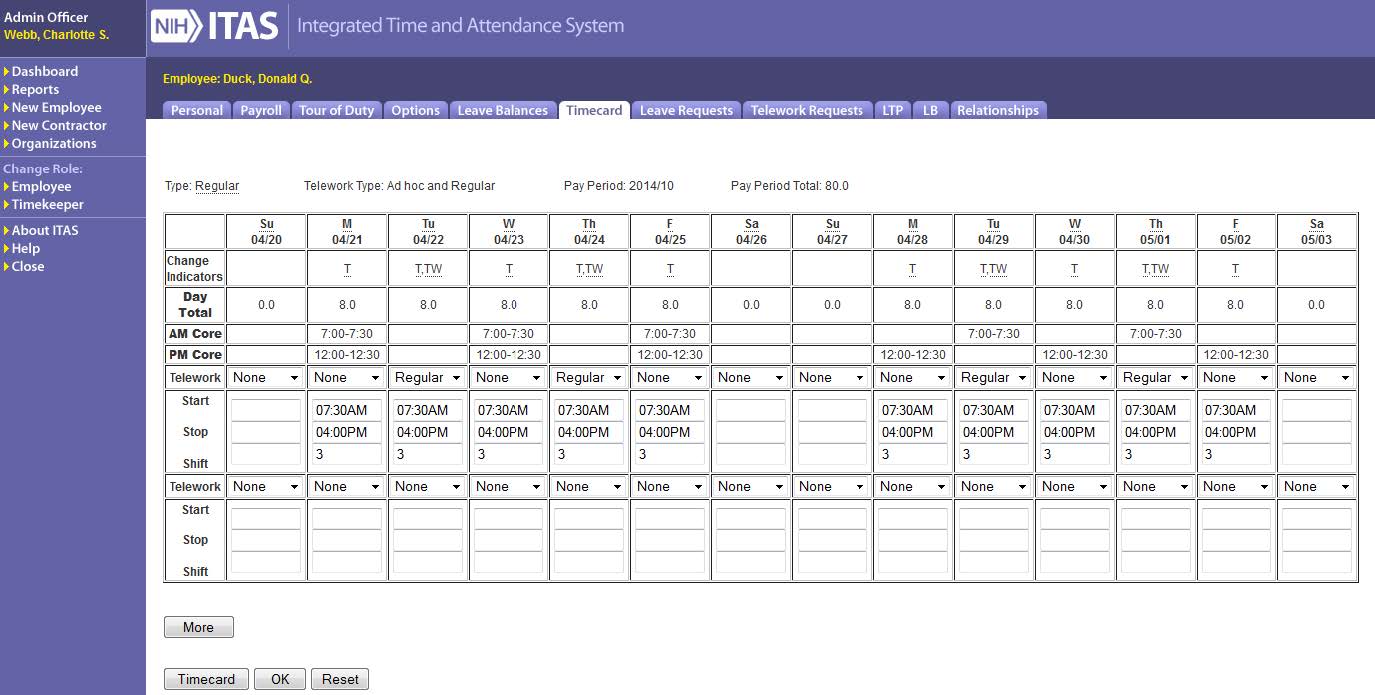
Modify an employee’s current hours
- Click on Timecard tab.
- Click on the day of the week in the appropriate hour type field.
- Enter hours in the field.
- Click OK to continue or reset to clear changes.
Note: Certain types of leave/hours require start and end times, including a.m. or p.m. This is indicated by a gray button to the left of the hour Type. You may either click this button OR click OK to enter start and end times. - Select a Telework type in the Hours Detail if needed. Select None to remove Telework hours. (If Telework is inserted into Timecard, must select Telework Location from Tour of Duty tab.)
- Enter start and stop times in the Hours Detail if required.
- Click OK to accept changes or Reset to clear.
Modify the employee’s previous Pay Period hours
- Click on Timecard tab.
- Select the pay period from the dropdown and click Select.
- Modify hours as above.
Note: A row in the supplement information at the bottom of the TC screen is created on both the current and the changed TC. On the changed TC it indicates that the existing TC has changed. On the current it indicates that a change was made to a prior pay period in the current pay period.
Remove a pending supplement
- Click on Timecard tab.
- Select the pay period from the dropdown and click Select.
- Clear the pending changes.
- Click OK.
Note: The pending supplement rows will be removed. If the supplement has already been applied, a supplement reversing the previous supplement is created.
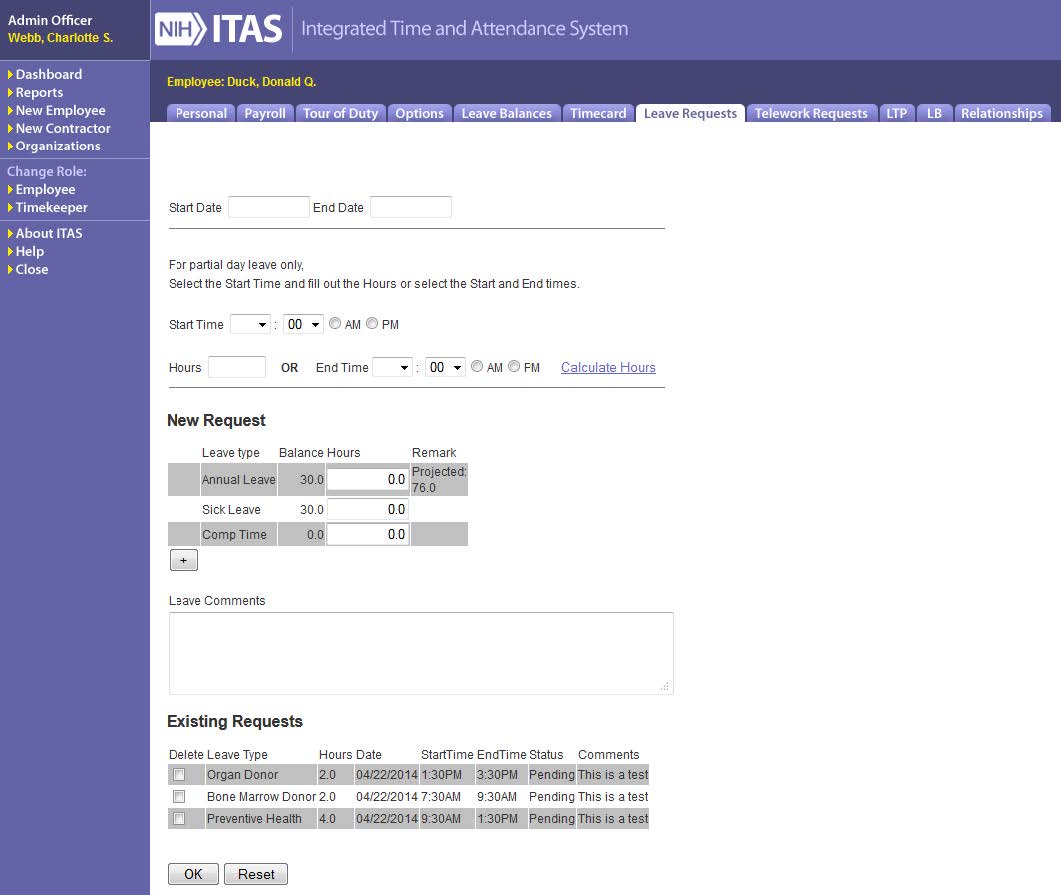
Leave Requests
Clicking the value in the Leave Requests column on the Dashboard or clicking the Leave Requests tab once in the Employee’s profile, displays the Leave Request screen. Requests can be submitted for a past, current or future pay period. Requests can be submitted for a partial day, a full day or multiple days. Multiple types of leave may be requested for the same day. Individual LRs must be saved before proceeding to the next. An email is automatically sent to the employee’s LAO each time an LR is submitted.
Leave Requests, initial view
Leave Requests, expanded view
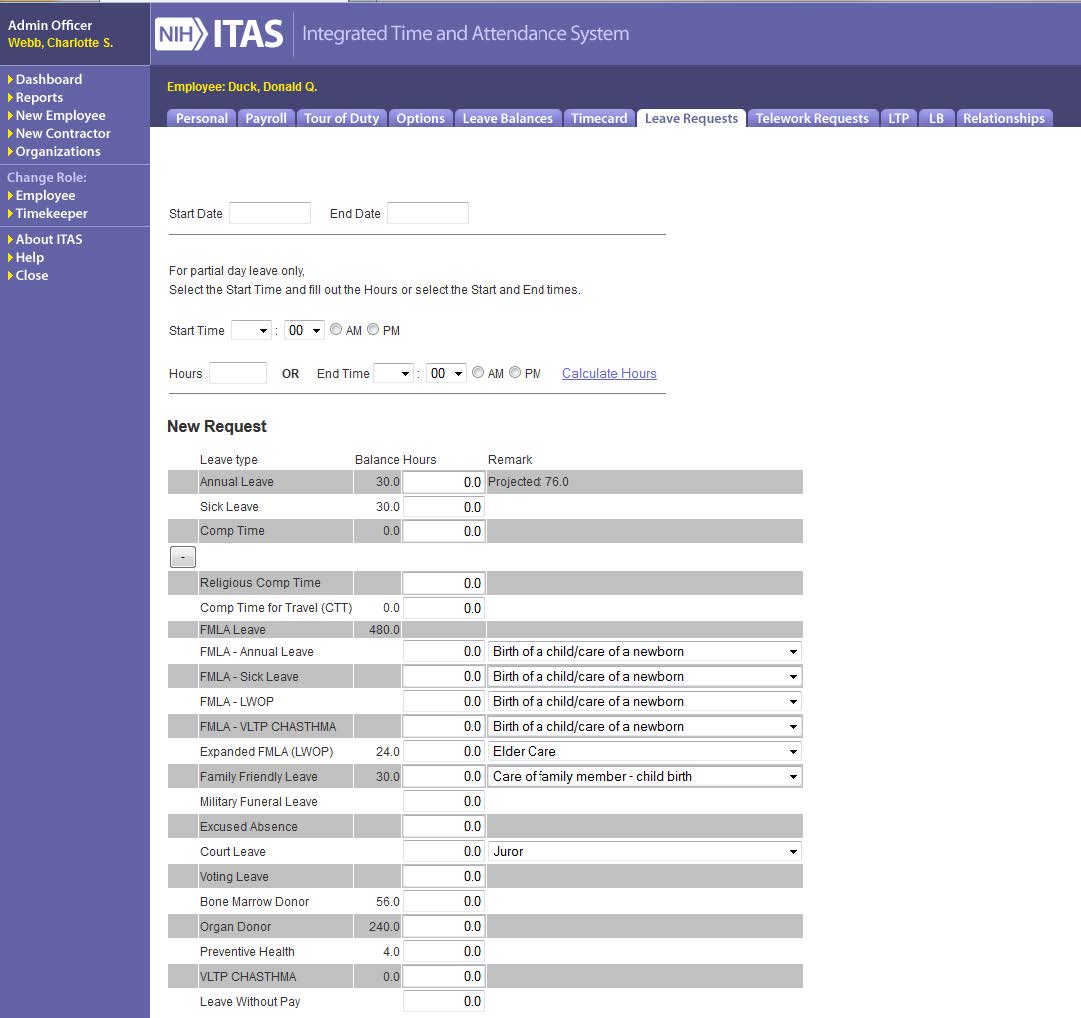
Full Day Request, Annual Leave (AL), Sick Leave (SL), Leave Without Pay (LWOP)
- Fill in the Start and End Dates. Full day requests do not require a start and end time. The system will assign the time from the regular tour hours.
- Select Annual Leave, Sick Leave or Leave Without Pay.
- Enter a comment if needed.
- Click OK.
Partial Day Request, AL, SL, LWOP
- Fill in the Start Date.
- Select Annual Leave, Sick Leave or Leave Without Pay.
- Fill in the Start Time.
- Enter either the Number of Hours or the Stop Time. Click Calculate Hours to fill in the missing Number of Hours or Stop Time.
- Enter a comment if needed.
- Click OK.
Requests, combined or other types
- Click the + button to show the Request Leave expanded view.
- Fill in requested dates and/or times as explained previously.
- Fill in the actual number of hours next to each selected leave type.
- Enter a comment if needed.
- Click OK.
Delete existing requests
- Scroll down to the Existing Leave Requests section.
- Click the check boxes next to the requests to delete.
- Click OK.
Telework Requests
Clicking the value in the Telework Request column on the Dashboard or clicking the Telework Request tab once in the Employee’s profile, displays the Telework Request screen. Requests can be submitted for a past, current a future pay period. Requests can be submitted for a partial day, a full day or multiple days. Individual Telework Requests must be completed before proceeding to the next. An email is automatically sent to the employee’s LAO and the Employee each time a Telework Request is submitted.
Telework Requests Screen
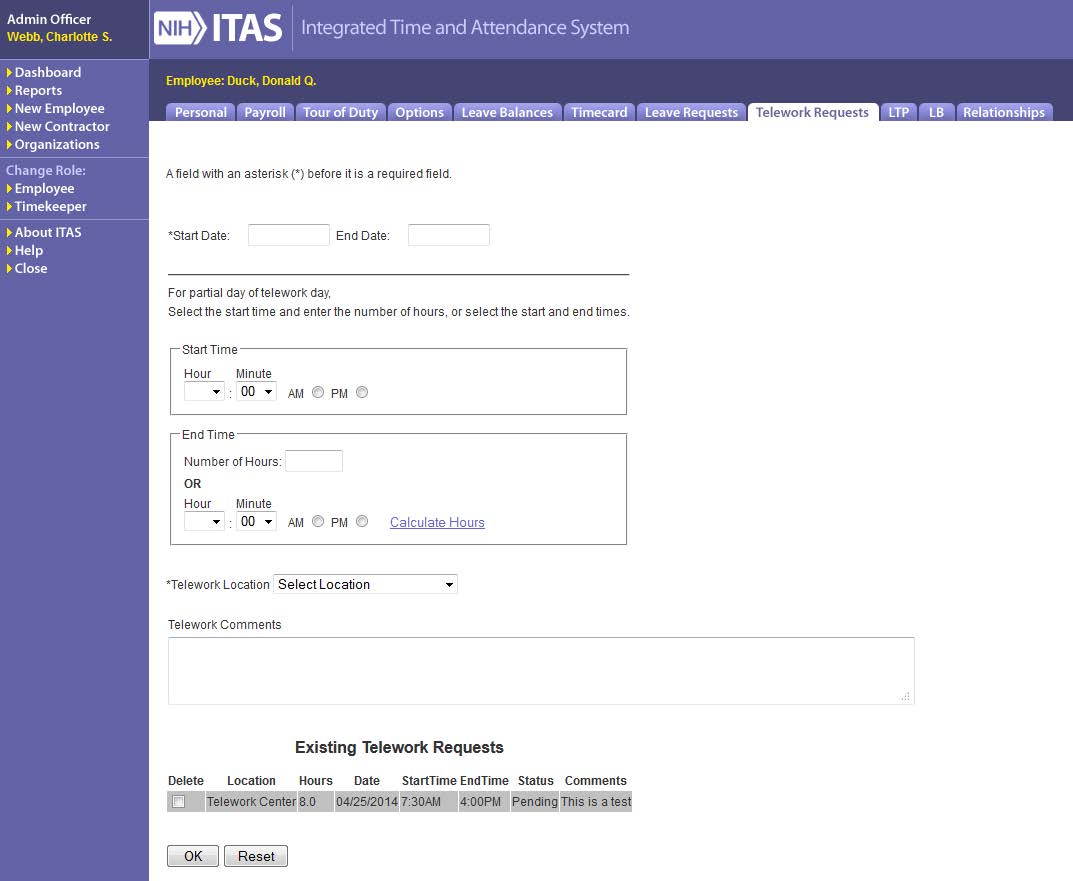
Full Day Ad Hoc Telework request
- Fill in the Start and End Dates. Full day requests do not require a start and end time. The system will assign the time from the regular tour hours.
- Select Telework Location.
- Enter a comment if needed.
- Click OK.
Partial Day Ad Hoc Telework request
- Fill in the Start Date.
- Fill in the Start Time.
- Select AM or PM.
- Enter either the Number of Hours or the Stop Time (AM or PM must be selected if Stop Time is selected).
- Click Calculate Hours to fill in the missing Number of Hours or Stop Time.
- Select Telework Location.
- Enter a comment if needed.
- Click OK.
Remove Ad Hoc Telework request(s)
- Scroll down to the Existing Telework Requests section.
- Click the check box next to the telework request(s) to delete.
- Click OK button
Leave Transfer Program (LTP)
Clicking the value in the LTP: Donate column on the Dashboard or clicking the LTP tab once in the Employee’s profile, displays the LTP Donations and Accounts screen. This screen allows you (on behalf of an employee) to donate some or all of an employee’s Annual or Restored Annual leave to an approved recipient. You can also check the status of any leave donated to you.
The Donations section of the screen displays the leave available to donate. The Name/Reason/Org dropdown contains the names and information of approved recipient. It also shows any donations made that have not yet been credited to the recipient’s account
The Accounts section of the screen displays information about any VLTP accounts that have been set up for an employee.
LTP screen
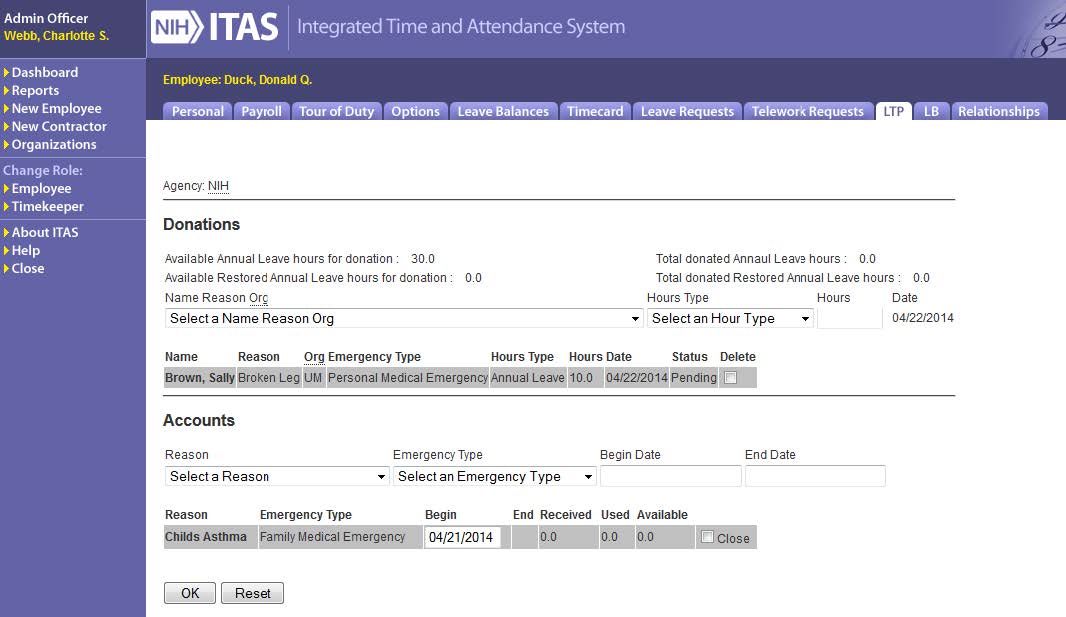
Donate Leave
- Select the recipient in the Name/Reason/Org dropdown.
- Select the type of hours to donate in the Hours Type dropdown.
- Enter the number of hours to donate. This must to be less than or equal to the donor’s available hours.
Note: Donated Hours must be in 1 hour increments. - Click OK.
- The new donation line is displayed on the LTP screen.
Delete a pending donation
- Check the Delete box at the end of the donation line(s) to delete. You can only delete pending donations.
- Click OK.
- The LTP screen is redisplayed without the donation line item
Set up an LTP Account
- Select a Reason from the dropdown list.
- Select an Emergency Type from the dropdown list.
- Enter a valid date in the Begin Date field.
Note: The End Date field will be populated when the LTP Account is closed. - Click OK.
- The Donate Leave screen is redisplayed with the account line item.
Close an LTP Account
- Check the Close box for the desired account.
- Click OK.
Note: The End Date is populated and the account can be reopened.
Reopen an LTP Account
- Check the Reopen box for the desired account.
- Click OK.
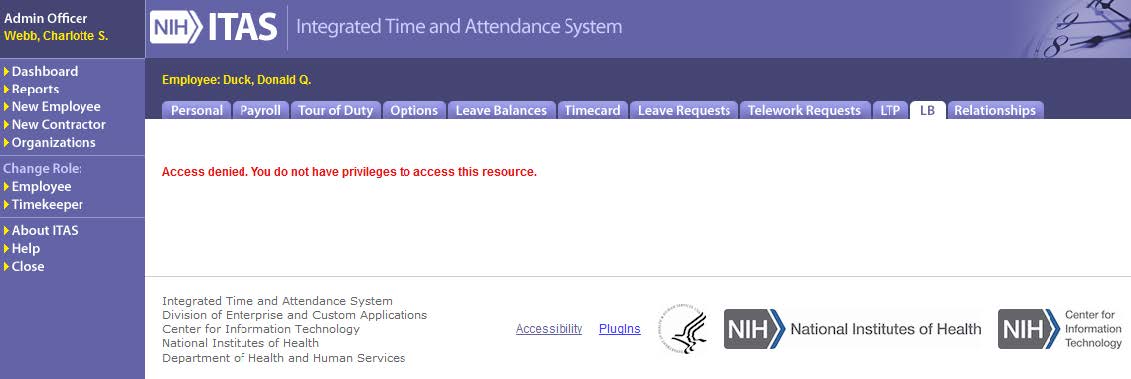
Leave Bank
Clicking the value in the Leave Bank column on the Dashboard or clicking the LB tab once in the Employee’s profile, displays the Leave Bank screen. You must have the Leave Bank Case Manager role in order to access the data from this screen.
LB Screen
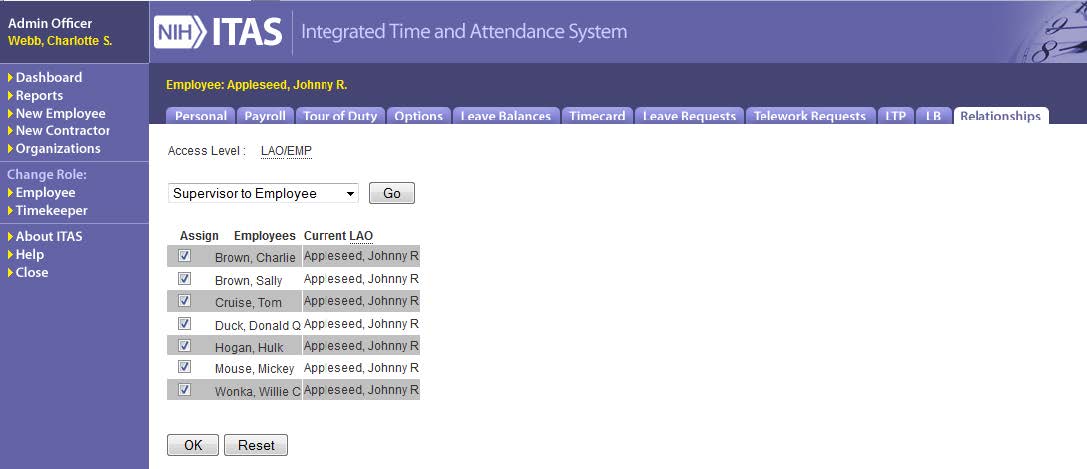
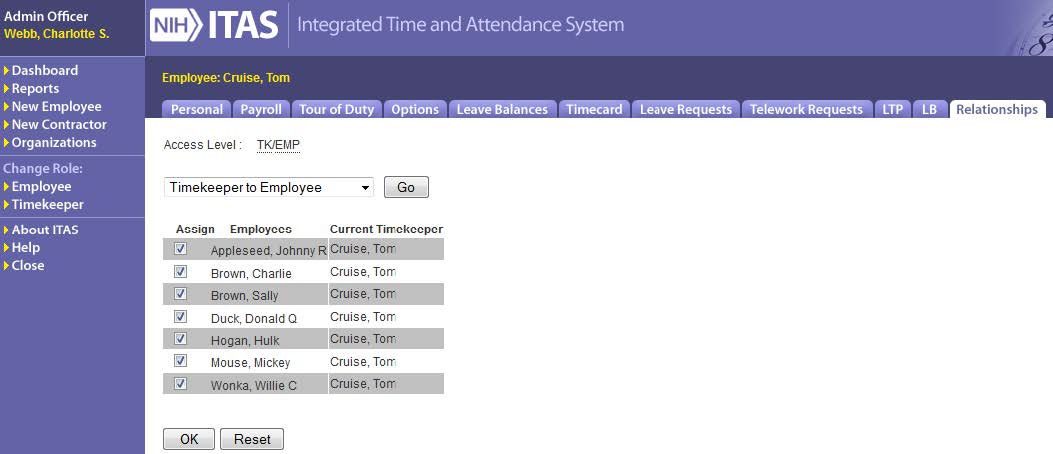
Relationships
Clicking the value in the Relationships column on the Dashboard or clicking the Relationships tab once in the employee’s profile, displays the Access Level screen. This screen allows you to set up relationships for a specific person that is dependent on their role.
Valid Relationships:
- LAO
- Supervisor to Employee
- Supervisor to Alt Supervisor
- TK
- Timekeeper to Employee
- Timekeeper to Alt Timekeeper
LAO – Supervisor to Employee screen
LAO – Supervisor to Alt Supervisor screen
Timekeeper – Timekeeper to Employee screen
Timekeeper – Timekeeper to Alt Timekeeper screen
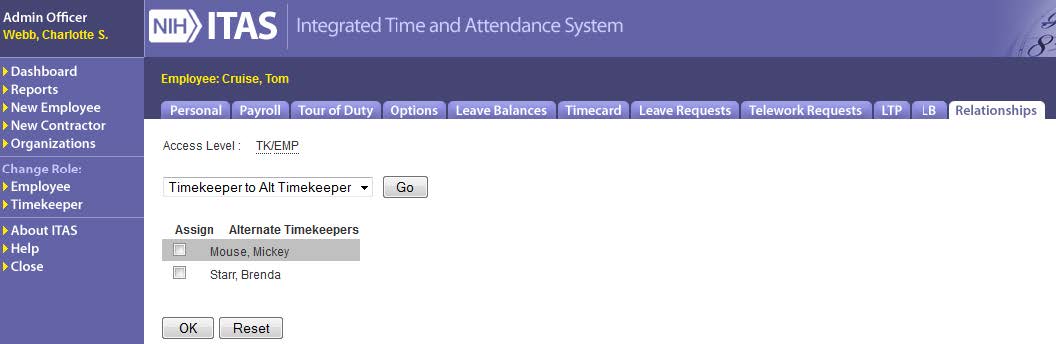
AO Relationships Screen field descriptions
| Label | Values / Actions | Description |
|---|---|---|
| Access Level | Information Only | Displays the Role of the selected employee. |
| Dropdown List | Relationship Type | Lists the Relationships available for the selected employee depending on the Role. |
| Go | Button / Click | Displays a list of employees available for a Relationship for the selected employee. |
| Assign | Check Box | Check to set Relationships. |
| Employees | Information Only | List of employees available for a Relationship for the selected employee. |
| Current LAO Current Timekeeper |
Information Only | Current LAO or Timekeeper of the list of employees. |
| OK | Button / Click | Validates changes and applies updates, if no errors are found. |
| Reset | Button / click | Ignores changes and redisplays the screen. |
Create Relationships
- Select a Relationship from the dropdown list.
- Click Go.
- Click the Assign box for the desired employee.
- Click OK.
Remove Relationships – Alternates Only
- Select a Relationship from the dropdown list.
- Click Go.
- Click the Assign box to remove the check for the desired employee.
- Click OK.
Reports
Clicking the Reports link on the left navigation area displays the Reports screen
Reports screen
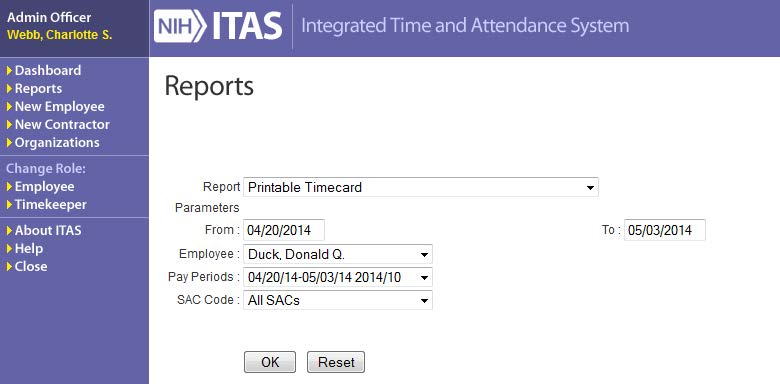
Execute a report
- Select the desired report from the dropdown list.
- Enter the From and To Dates or select a Pay Period.
- Click OK to execute the report or Reset to start over.
- The requested report is displayed in another browser window.
Note: The required parameters for each report are displayed in the Instructions section of the screen.
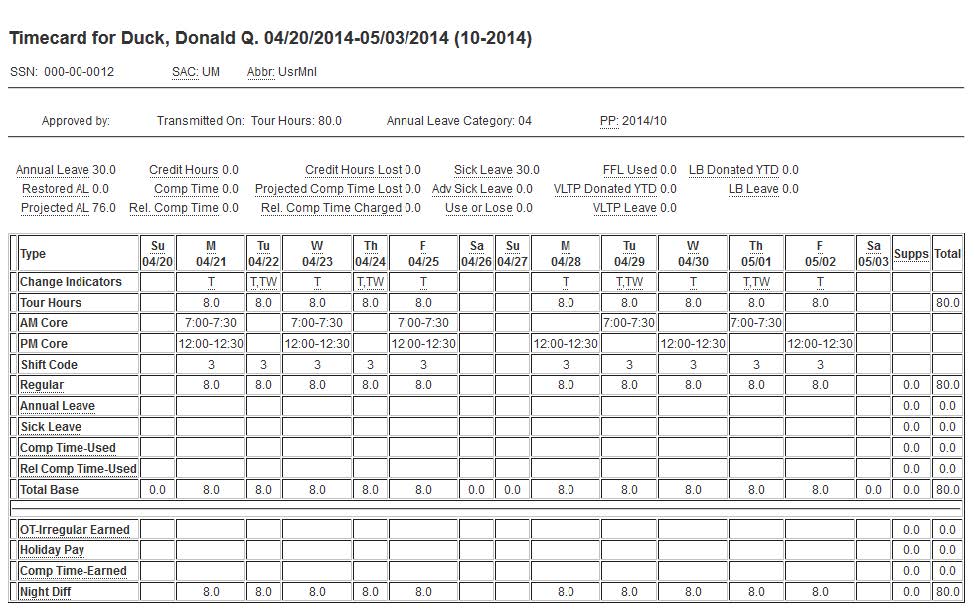
Printable Timecard Report
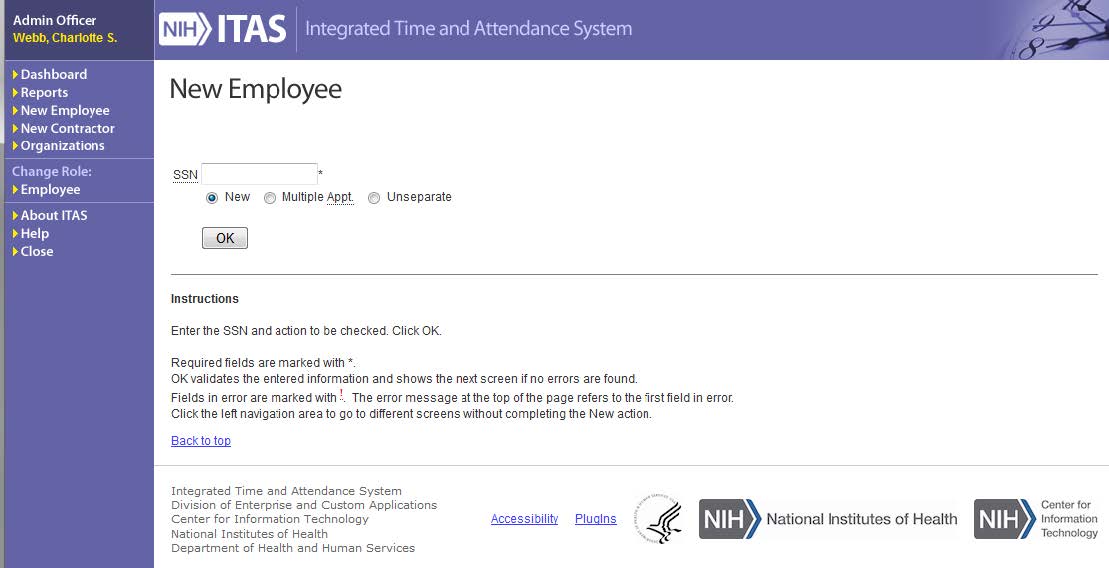
New Employee
Clicking on the New Employee link on the left navigation area displays the New Employee screen. This screen allows you to perform the following functions:
- Add a new Federal employee
- Add multiple assignments to a Federal employee - employee working for two or more organizations at NIH; used for Consultants / Committee Members
- Un-separate a Federal employee Reinstate Federal employees who have previously been added to ITAS and then separated
New Employee screen
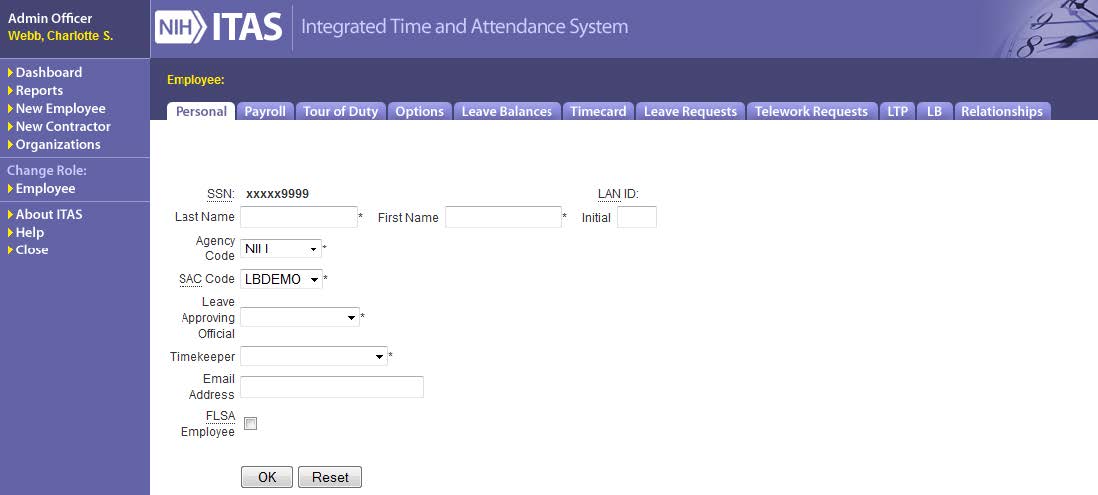
Add New Employee
- Enter a valid 9 digit social security number for Federal employees
- Click OK
The Personal screen is displayed, with tabs for the additional information needed for a new or existing employee. Please refer to the previous sections for more information concerning each screen.
Personal screen and additional tabs for New Employee
New Employee – Multiple Appointments

Add Multiple Appointment
- Click the Multiple Appt. radio button
- Enter a valid 9 digit social security number for Federal employees
- Click OK
New Employee – Unseparate
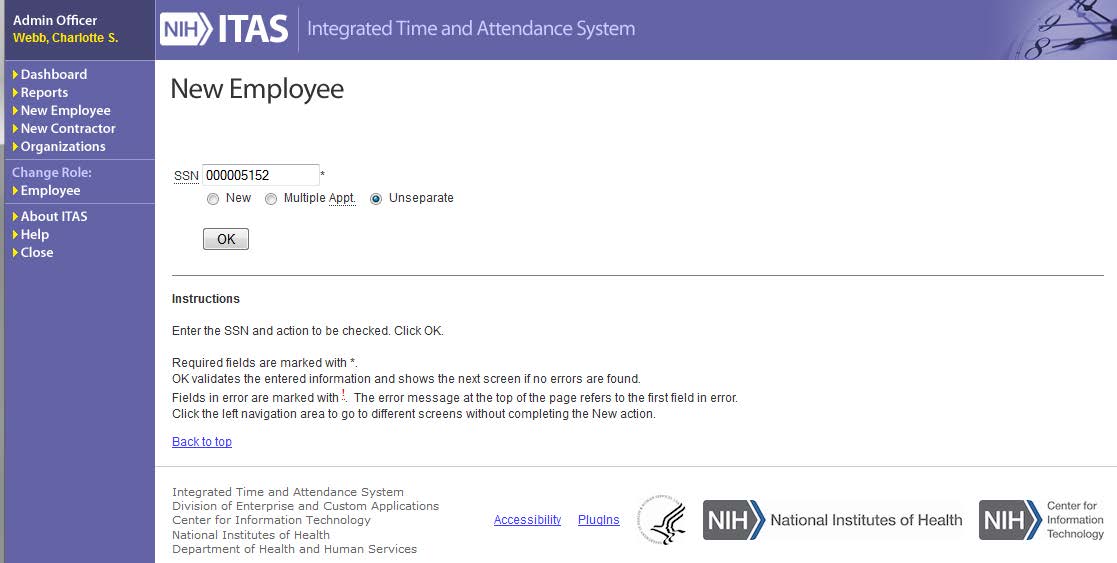
Unseparate an Employee
- Click the Unseparate radio button
- Enter a valid 9 digit social security number for a separated Federal employees
- Click OK
New Contractor
Clicking on the New Contractor (Non-Federal Employee) link on the left navigation area displays the New Contractor screen. This screen allows you to perform the following functions:
- Add a new contractor
- Un-separate a contractor – Reinstate contractors who have previously been added to ITAS and then separated
New Contractor screen

Add New Contractor
- Enter a valid 9 digit Badge ID (NIH badge number) the contractor
- Click OK
New Contractor – Unseparate

Unseparate a Contractor
- Click the Unseparate radio button
- Enter a valid 9 digit Badge ID for a separated contractor
- Click OK
Organizations
Clicking the Organizations link on the left navigation area displays the Organization screen. This screen allows you to perform the following functions:
- Add a new organization
- Modify an existing organization
- Delete an existing organization
Organizations screen
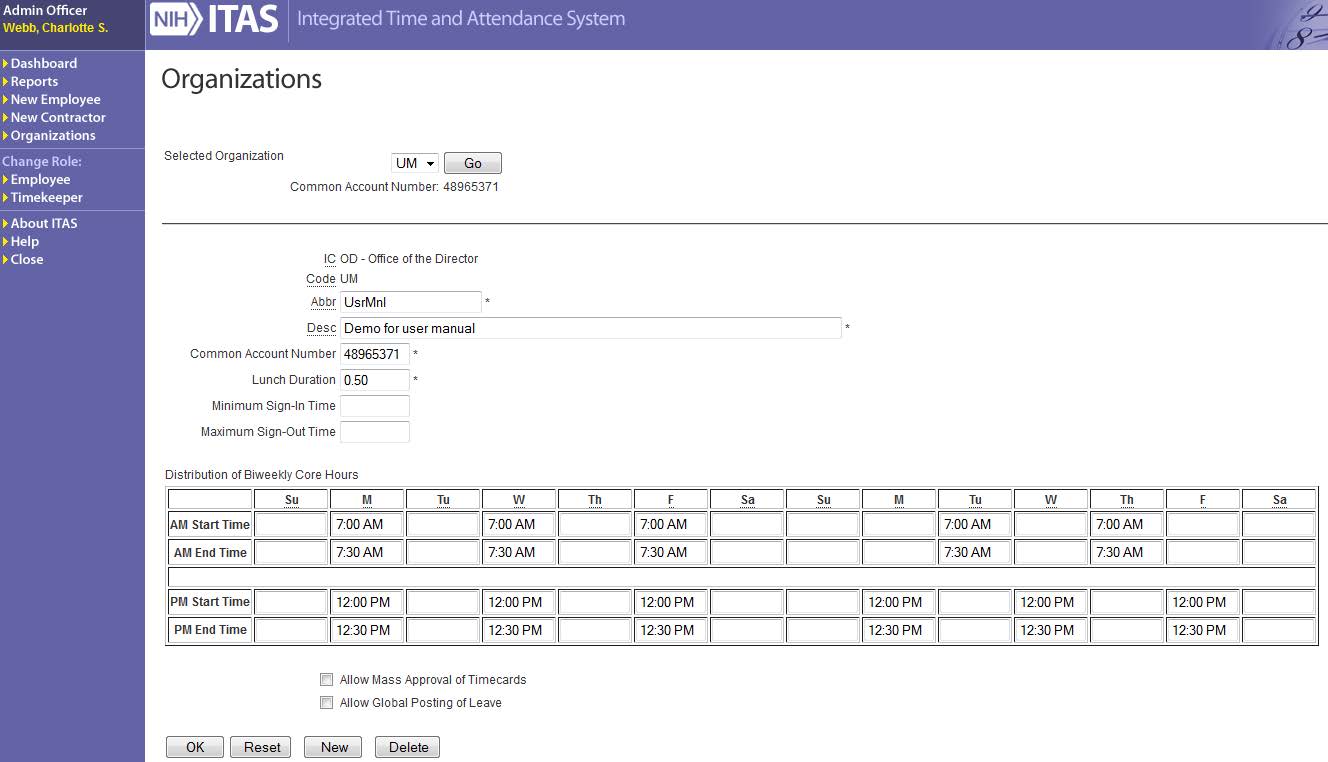
Add a new organization
- Click New.
- Populate the required fields.
- Click OK to save or Reset to clear.
Modify an existing organization
- Make a selection from the Organizations dropdown list.
- Click Go.
- Make the desired changes.
- Click OK to save or Reset to clear.
Create or modify Core Hours for an existing organization
- Make a selection from the Organizations dropdown list.
- Click Go.
- If Core Hours are in the AM, the AO must insert both AM Start Time and AM Stop Time.
- If Core Hours are in the PM, the AO must insert both PM Start Time and PM Stop Time.
- AO can NOT insert Core Hours in more than 9 work days.
Note: Core hours are required for organizations that will allow employees to have a Maxiflex tour of duty. AO cannot delete all Core Hours for an Organization if there are employees currently on a Maxiflex tour of duty.
Steps to delete an existing organization
- Make a selection from the Organizations dropdown list
- Click the Go button
- Click the Delete button
- Click the OK button on the Confirmation screen
Note: An Organization cannot be removed if there are employees assigned to it.