The following screens and functions are available to all employees when signed on under the Leave Approving Official (LAO) role. The same screens and functions are available when you are “acting as” an alternate LAO.
Approve Leave
Clicking the Approve Leave link on the left navigation displays the Approve Leave screen. This screen allows the LAO to Approve or Deny leave requests for the employees for whom they are responsible. The LAO can also view the Leave Request Detail, Leave Calendar, Timecard, Leave Balances and Tour Of Duty for a specific employee.
Approve Leave screen
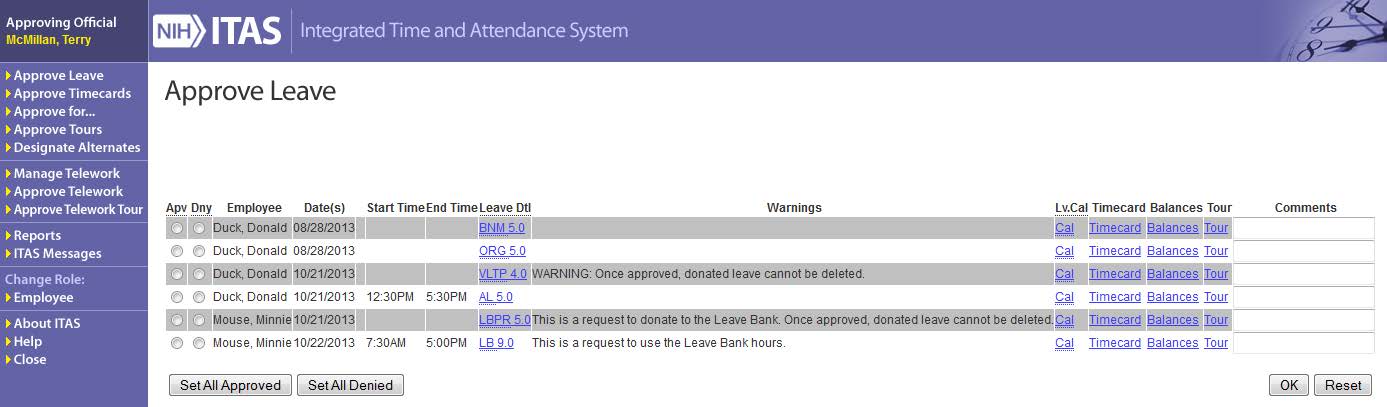
LAO Approve Leave field descriptions
| Label | Values / Actions | Description |
|---|---|---|
| Apr | Radio Button / Click | Click to Approve Leave Request. |
| Dny | Radio Button / Click | Click to Deny Leave Request. |
| Employee | Information Only | Name of employee requesting leave. |
| Date(s) | Date | Date or date range of leave requested. |
| Plus / Minus | Button / Click | Expand or Compress displayed information. |
| Start Time | Time | Start time of leave requested. |
| End Time | Time | End time of leave requested. |
| Leave Dtl | Link to Leave Detail | Display of leave request detail information. |
| Warnings | Warning Message | Message concerning the leave request. |
| Lv. Cal | Link to Leave Calendar | Display of Leave Calendar for the current month. |
| Timecard | Link to Timecard | Display of the current Timecard for the selected employee. |
| Balances | Link to Leave Balances | Display of the current Leave Balances for the selected employee. |
| Tour | Link to Tour of Duty | Display of current Tour of Duty for the selected employee. |
| Comments | Text Area | Enterable field for comments concerning leave request. |
| Set All Approved | Button / Click | Selects all of "Approved" radio buttons for the displayed leave requests. |
| Set All Denied | Button / Click | Selects all of "Denied" radio buttons for the displayed leave requests. |
| OK | Button / Click | Validates changes and applies updates, if no errors are found. |
| Reset | Button / Click | Ignores changes and redisplays the screen. |
Approve or Deny Leave Request
- Click the Approve (Apv) or Deny (Dny) radio button for the selected employee.
- Enter text in the Comments field if needed.
- Click OK.
- The Approve Leave screen is redisplayed and the checked item is removed.
Note: Click the ‘Set All Approved’ or ‘Set All Denied’ button to process all of the requests at once.
Approve Timecards
Clicking the Approve Timecards link on the left navigation area displays the Approve Timecards screen. The screen allows the LAO or Alternate LAO to approve timecards for the employees for whom they are responsible.
Approve Timecards screen
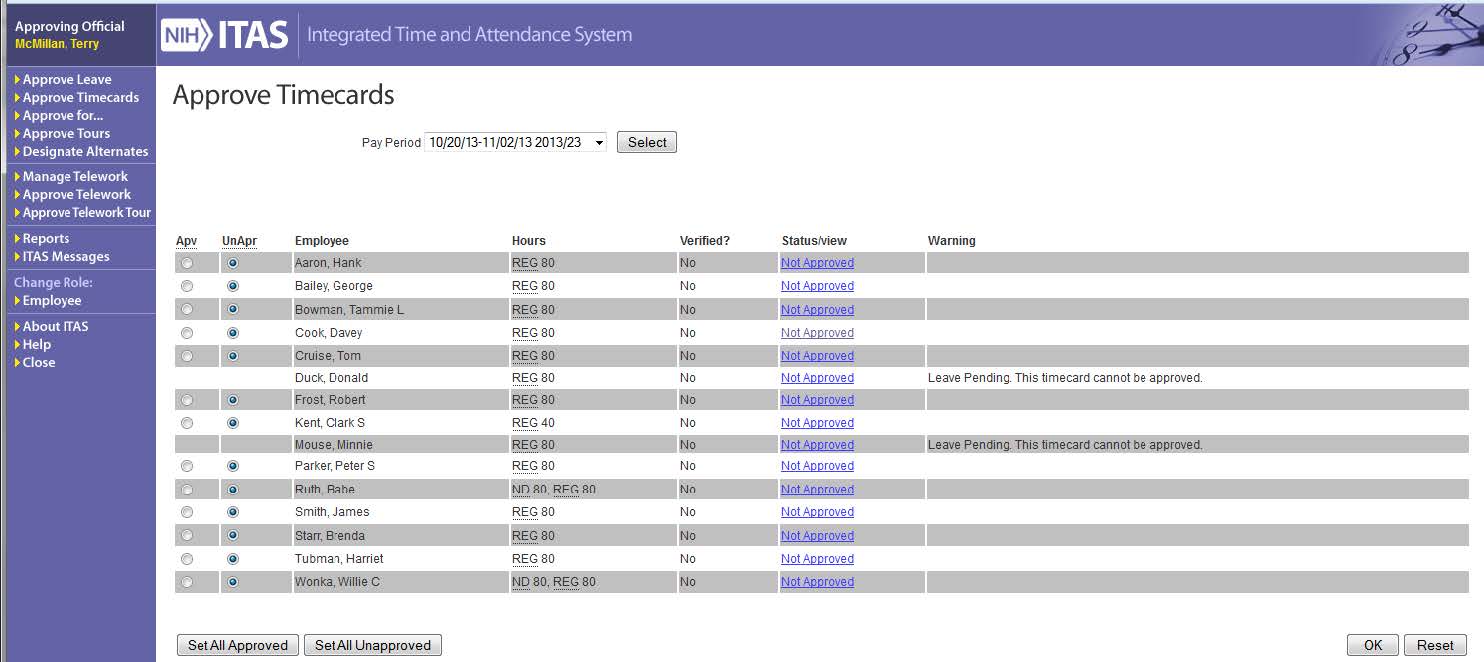
Note: The Approve and Unapprove radio buttons are not displayed if the employee has a pending leave request for the current pay period or any other issue where a message is displayed.
LAO Approve Timecards screen field descriptions
| Label | Values / Actions | Description |
|---|---|---|
| Apr | Radio Button / Click | Click to Approve timecard. |
| UnApr | Radio Button / Click | Click to Unapprove timecard. |
| Employee | Information Only | Name of employee on timecard. |
| Hours | Type & Number of Hours | Displays type and number of hour worked, as well as type and number of hours taken for leave. |
| Verified? | Yes / No | Displays Yes if the employee has verified the timecard hours. Displays No as default. |
| Status/View | Link to Timecard | Displays the current timecard of the selected employee. |
| Warnings | Warning Message | Message concerning the timecard. |
| Set All Approved | Button / Click | Checks all of the "Approve" boxes for the displayed timecards. |
| Set All Unapproved | Button / Click | Checks all of the "Unapprove" boxes for the displayed timecards. |
| OK | Button / Click | Validates changes and applies updates, if no errors are found. |
| Reset | Button / Click | Ignores changes and redisplays the screen. |
Approve or Unapprove Timecards
- Click the Approve (Apv) or Unapprove (UnApr) radio button for the selected employee(s).
- Click OK.
- The Approve Timecards screen is redisplayed and the value in the Status/View column has beenupdated accordingly.
Note: Click the ‘Set All Approved’ or ‘Set All Unapproved’ button to process all of the Timecards at once.
View a Timecard
- Click the link in the Status/View column to display the Printable Timecard report.
- Click the button to the left of the Type column to display the Start/Stop Times.
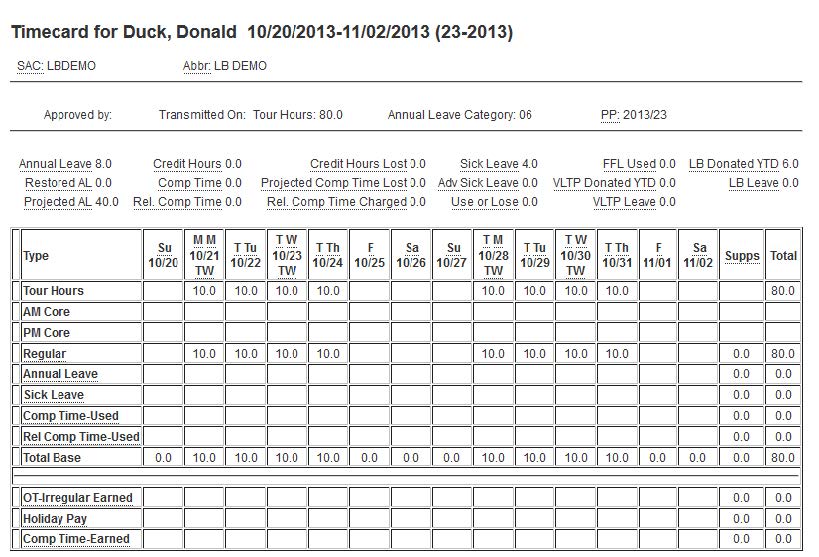
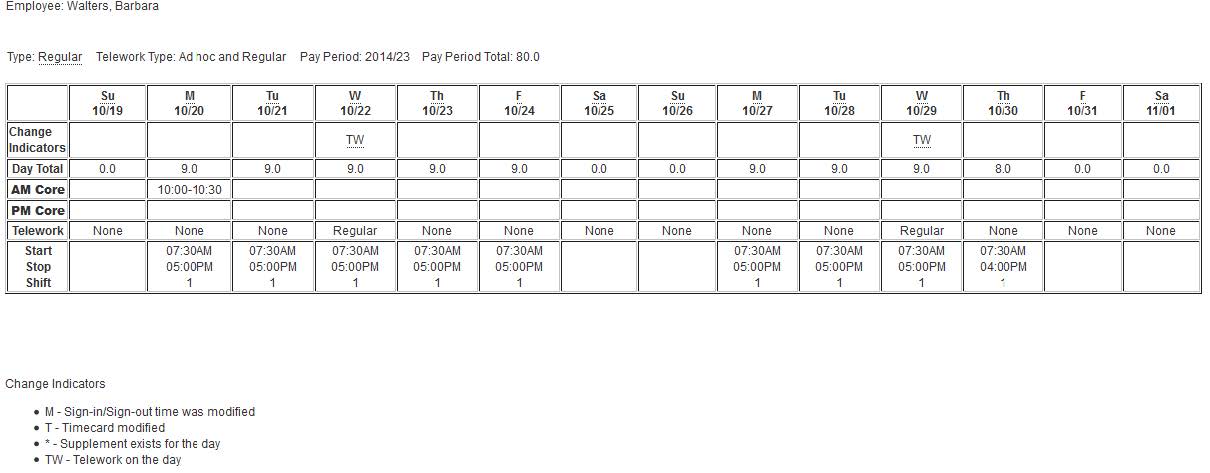
Timecard
Clicking the active link in the Status/View column from the Approve Timecards displays a ready-only version of the employee’s timecard in a new window. Clicking the button to the left of the Type column displays the employee’s Timecard Details screen with the Start/Stop Times.
Timecard screen
Timecard details screen
Approve for... (Act As)
Clicking the Approve for... link on the left navigation area displays the Approve For screen. This screen allows you to select another LAO and perform the following functions on his/her behalf:
- Approve Leave Requests
- Approve Timecards
- Approve Tours
- Manage Telework
- Approve Telework
- Approve Telework Tour
- Execute Reports
Approve For screen
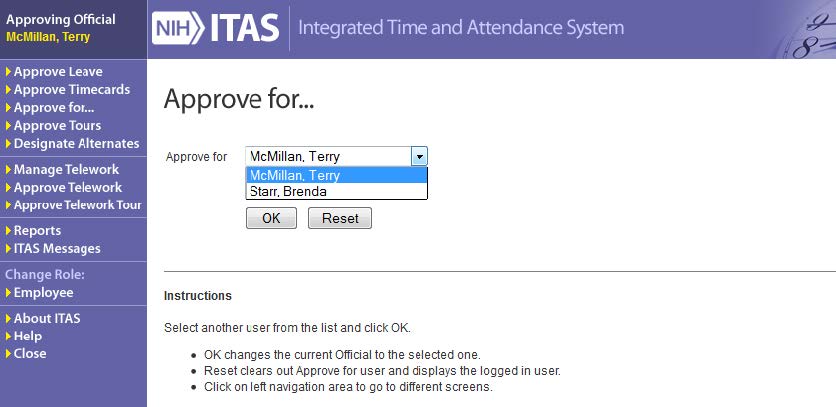
Act as Alternate, “Approve For” screen

Approve For an Alternate LAO
- Select the alternate from the dropdown list.
- Click OK.
Note: The identification area displays the name of the person whom you are “Acting As”.
Act as yourself
- Click Reset.
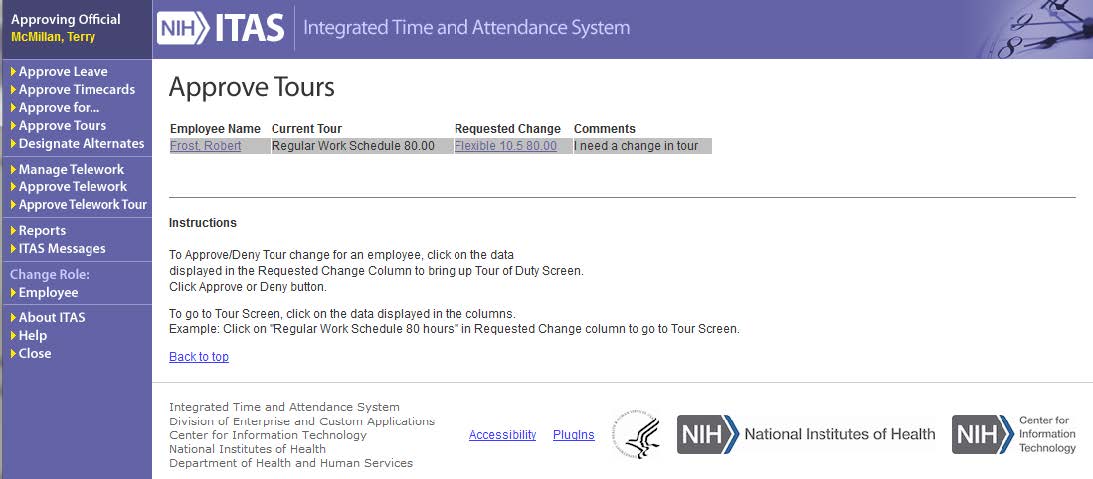
Approve Tours
Clicking the Approve Tours link on the left navigation area displays the Approve Tours screen. This screen allows you to approve the Tour of Duty changes requested by the employees for whom you are responsible.
Approve Tours screen
LAO Approve Tours screen field descriptions
| Label | Values / Actions | Description |
|---|---|---|
| Employee Name | Link to requested tour of duty. | Displays the requested tour of duty with a pending status. |
| Current Tour | Information Only | Displays employee's current tour of duty. |
| Requested Change | Link to requested tour of duty. | Displays the requested tour of duty with a pending status. |
| Comments | Information Only | Comments entered by employees concerning the tour of duty change request. |
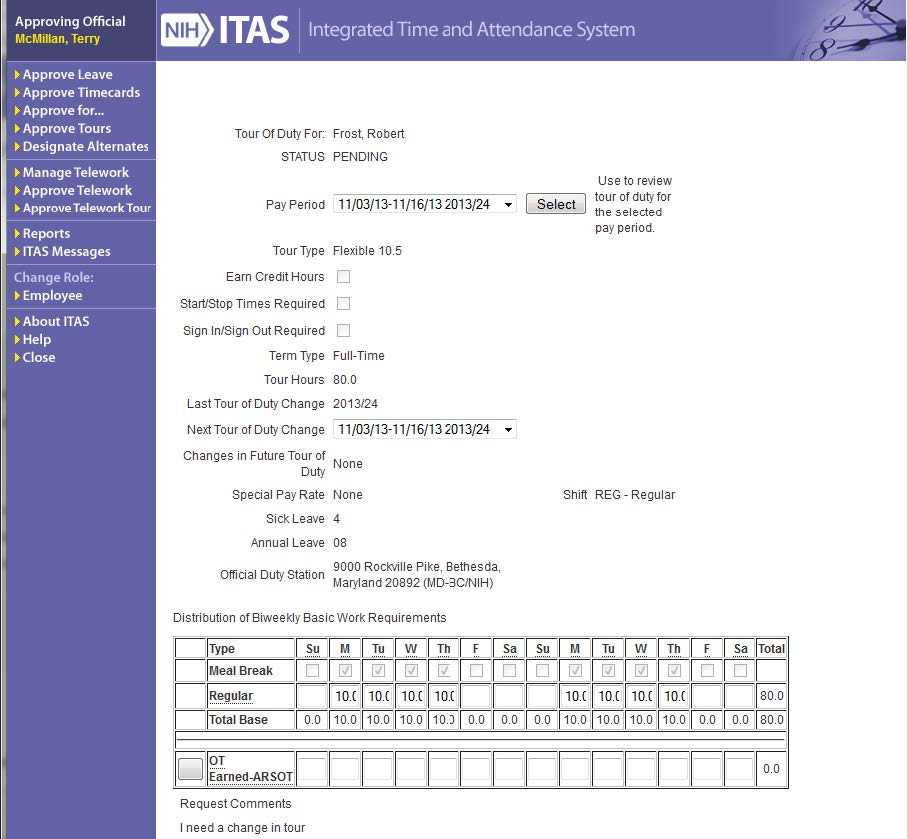
Tour Of Duty screen
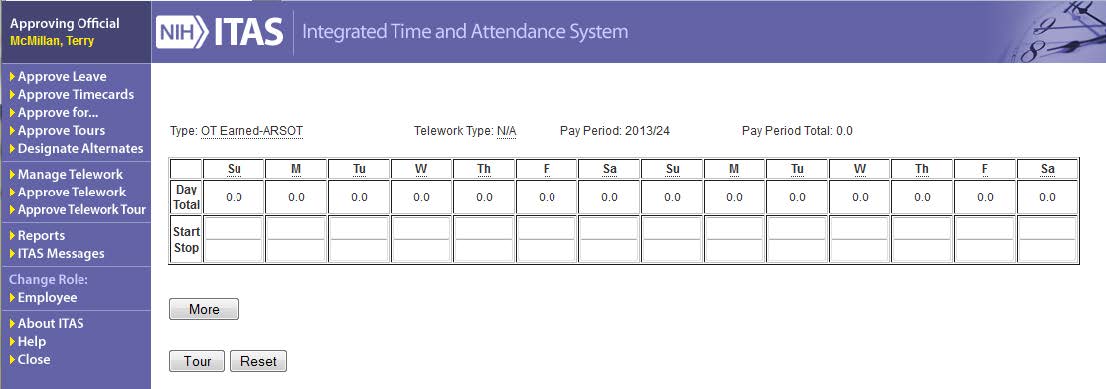
Tour Of Duty OT Earned-ARSOT Hours details screen
LAO Pending Tour of Duty Change screen field descriptions
| Label | Values / Actions | Description |
|---|---|---|
| Tour of Duty For | Information Only | Name of Employee |
| STATUS | Information Only | Status of the Tour of Duty change request. |
| Pay Period | Select Pay Period | List of pay periods. |
| Select Button | Click | Displays tour information for the selected pay period. |
| Tour Type | Information Only | Displays the requested tour schedule. |
| Earn Credit Hours | Information Only | Checked if employee is able to earn Credit Hours. |
| Start / Stop Times Required | Information Only | Displays if employee is required to insert Start and Stop times into Timecard as part of the Maxiflex Tour. |
| Sign In / Sign Out Required | Information Only | The check box was intended for use with the Maxiflex Tour Type, but was deemed unnecessary. |
| Term Type | Information Only | Usually Full Time, Part Time, or Intermittent. |
| Tour Hours | Information Only | Displays the number of hours for the selected tour. |
| Last Tour of Duty Change | Information Only | Displays the pay period of the pending change. |
| Next Tour of Duty Change | Select | Displays the pay period to which the requested change will be applied. |
| Changes in Future Tour of Duty | Information Only | Displays the year and pay period of a future scheduled Tour change, if any. |
| Special Pay Rate | Information Only | Usually NONE, valid for certain Tour Types. |
| Shift | Information Only | Usually Regular, valid for certain Tour Types. |
| Sick Leave | Information Only | Displays the number of Sick Leave hours accrued per pay period. |
| Annual Leave | Information Only | Displays the number of Annual Leave hours accrued per pay period. |
| Official Duty Station | Information Only | Official Duty Station location for non-Telework tour days. |
| Telework Location | Information Only | Location where Telework will be performed. (Field will only be displayed if Employee is eligible for Telework.) |
| Distribution of Biweekly Basic Work Requirements Table | ||
|---|---|---|
| Meal Break | Information Only | Indicates whether a meal break is required. |
| (Regular) zoom Button | Click | Shows the Hours Detail screen for the Regular Tour hours. |
| (Regular) Hours | Hours | Displays the number of hours for each type and day. |
| (OT Earned - ARSOT) Button | Click | Displays the Hours Detail screen for the OT Earned - ARSOT hours. |
| (OT - Earned ARSOT) Hours | Hours | Displays the number of hours for each type and day. |
| Request Comments | Information Only | Displays the comments entered by the employee. |
| Comments (Required) | Text Area | Enterable field for comments concerning the approval or denial of tour change request. |
| Approve | Button / Click | Approves the requested tour change. |
| Deny | Button / Click | Approves the requested tour change. |
| Reset | Button / Click | Ignores pending changes and redisplays the screen. |
Note: The type of hours displayed in the Distribution of Biweekly Basic Work Requirements Table is dependent upon the type of employee and tour of duty.
Approve / deny Tour Of Duty dhange request
- Click the Employee’s Name or Requested Change links to display the Tour Of Duty screen
- Click the REG hours zoom button (if applicable) to view the hours details for the tour
- Click the Tour button to return to the Tour of Duty screen
- Enter Comments
- Click the Approve or Deny button to process the request
Designate Alternates
Clicking the Designate Alternates link on the left navigation area displays the Designate Alternates screen. This screen allows you to select another LAO and perform the following functions on your behalf:
- Approve Leave Requests
- Approve Timecards
- Approve Tours
- Manage Telework
- Approve Telework
- Approve Telework Tour
- Execute Reports
- Receive email notifications concerning assigned employees
Designate Alternates screen
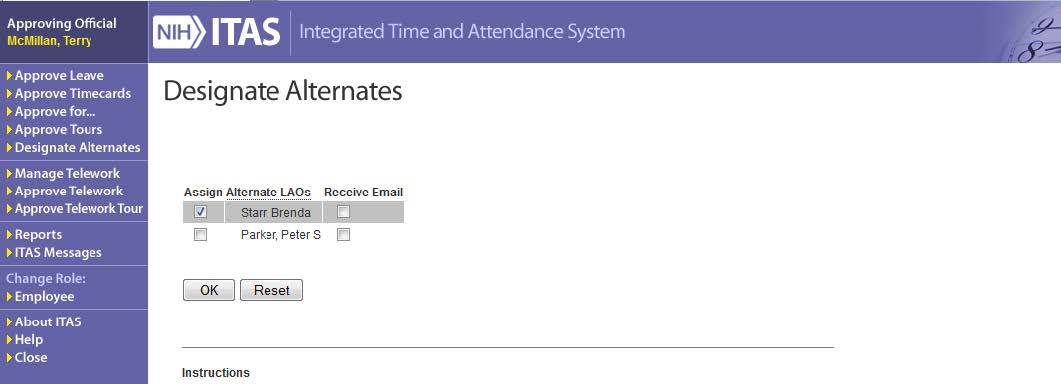
Designate another LAO as an Alternate
- Check the Assign box for the desired Alternate LAO.
- Check the Receive Email box for the designated LAO to receive email notifications.
- Click OK to save the selection or Reset to clear the check box.
Note: Designated LAO must have valid email address in ITAS in order to receive email notifications.
Manage Telework
Clicking on the Manage Telework link on the left navigation displays the Manage Telework screen. This screen lists all assigned employees and information relating to an employee’s telework eligibility.
Manage Telework screen

LAO Manage Telework fields descriptions
| Label | Values / Actions | Description |
|---|---|---|
| Employee | Information Only | Displays the assigned employees' names. |
| Telework Details | Button / Click | Brings LAO to details screen for adding / removing / changing telework privileges. |
| Status | Information Only | Displays the Eligibility of the employee's Telework Status. |
| Type | Information Only | Displays the Type of Telework the employee currently has. |
| Start Date | Information Only | Displays the date the employee received Telework eligibility. |
| Expiration Date | Information Only | Displays the date the employee's Telework eligibility expires. |
| Termination Date | Information Only | Displays the date the employee's ability to request Telework was removed. |
Manage Telework Details
By clicking on a Telework Details button next to an employee’s name in the Manage Telework Screen, a LAO will be able to add, remove or update an employee’s Telework Eligibility.
Manage Telework Details screen
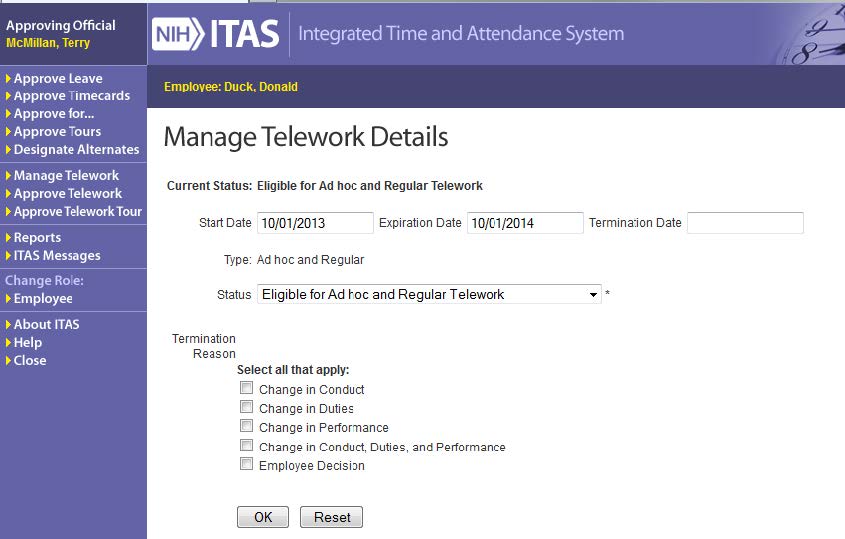
LAO Manage Telework Details fields descriptions
| Label | Values / Actions | Description |
|---|---|---|
| Start Date | Valid Date | Displays the date the employee received Telework eligibility. |
| Expiration Date | Valid Date | Displays the date the employee’s Telework eligibility expires. If LAO inserts start date, but no Expiration Date, Expiration Date will default to one calendar year after start date. |
| Termination Date | Valid Date | Displays the date the employee’s ability to request Telework was removed. Termination date must be inserted if Status is set to Eligible Employee Declined to Telework, Ineligible Based on Conduct, Ineligible Based on Duties, Ineligible Based on Performance or Ineligible Based on Conduct, Duties, and Performance. The corresponding Termination Reason must also be selected. |
| Type | Information Only | Displays the Type of Telework privileges the employee has: Regular, Ad Hoc or Regular and Ad Hoc (this field is determined by selection made from Status field.) |
| Status | Select Status | Displays the Eligibility of the employee’s Telework Status: Regular, Ad Hoc or Regular and Ad Hoc or Ineligible (for reason.) If Status = Ineligible Based on Tenure, no termination date is needed. |
| Termination Reason | Select Reason | Displays the reason that an employee’s Telework eligibility was removed. (If Termination Reason = Ineligible Based on Tenure, no termination date is needed.) |
| OK | Button / Click | Validates changes and applies updates, if no errors are found. |
| Reset | Button / Click | Ignores changes and redisplays the screen. |
Make an employee eligible for Telework
- Insert a Start Date.
- Select a specific Telework eligibility Status:
- Eligible for Regular Telework
- Eligible for Ad hoc Telework
- Eligible for Ad hoc and Regular Telework
- Do not select a Termination Reason.
- Click OK.
- An email notification will be sent to the Employee and LAO informing them of the employee’s Telework status.
Note: An email notification will be sent to the Employee and LAO 30 days prior to the employee’s telework Expiration Date. For the Employee to continue to be eligible for telework, the Expiration Date must be updated on or after the current Expiration Date.
Remove an employee’s Telework eligibility
- Insert a Termination Date
- Select a Status that reflects the Employee’s specific reason for removing Telework eligibility:
- Eligible Employee Declined to Telework
- Ineligible Based on Conduct
- Ineligible Based on Duties
- Ineligible Based on Performance
- Ineligible Based on Conduct, Duties, and Performance
- Check the appropriate Termination Reason check box
- Click OK
- An email notification will be sent to the Employee and LAO informing them of the employee’s Telework status.
- LAOs may also select a Status of “Ineligible Based on Tenure” for an Employee that does NOT have Telework eligibility. If a Status of “Ineligible Based on Tenure” is selected, do not insert Start Date, End Date or Termination Reason
Approve Telework
Clicking on the Approve Telework link on the left navigation displays the Approve Telework screen. This screen allows the LAO to Approve or Deny ad hoc Telework requests for the employees for whom they are responsible. The LAO can also view the Timecard for a specific employee.
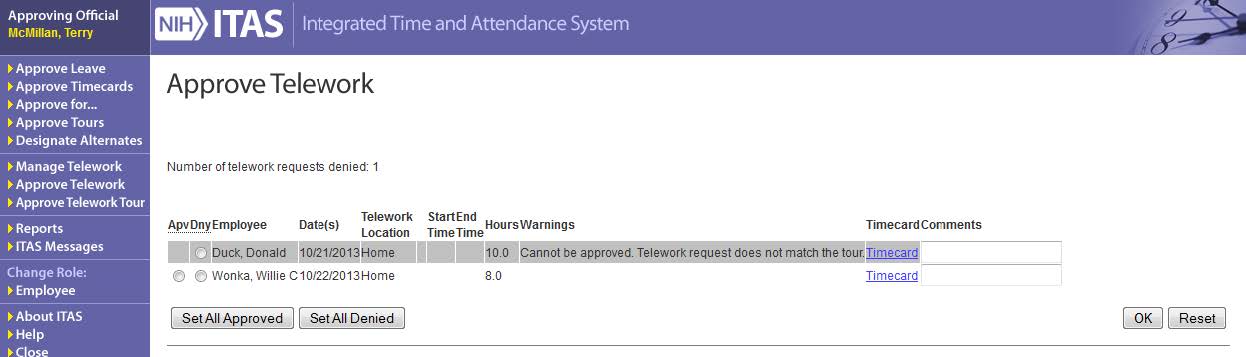
LAO Approve Telework field descriptions
| Label | Values / Actions | Description |
|---|---|---|
| Apr | Radio Button / Click | Click to Approve Telework Request. |
| Dny | Radio Button / Click | Click to Deny Telework Request. |
| Employee | Information Only | Name of employee requesting Telework. |
| Date(s) | Date | Date or date range of Telework requested. |
| Telework Location | Information Only | Location where Telework will be performed. |
| Plus / Minus | Button / Click | Expand or Compress displayed information. |
| Start Time | Time | Start time of Telework requested. |
| End Time | Time | End time of Telework requested. |
| Hours | Information Only | Total number of hours for Telework request. |
| Warnings | Warning Message | Message(s) concerning the Telework request. |
| Timecard | Link to Timecard | Display of the current Timecard for the selected employee. |
| Comments | Text Area | Enterable field for comments concerning Telework request. |
| Set All Approved | Button / Click | Selected all of "Approved" radio buttons for the displayed Telework requests. |
| Set All Denied | Button / Click | Selects all of "Denied" radio buttons for the displayed Telework requests. |
| OK | Button / Click | Validates changes and applies updates, if no errors are found. |
| Reset | Button / Click | Ignores changes and redisplays the screen. |
Approve or Deny Telework Request
- Click the Approve (Apv) or Deny (Dny) radio button for the selected employee.
- Enter text in the Comments field if needed.
- Click OK.
- The Approve Telework screen is redisplayed and the checked item is removed.
Note: Click the ‘Set All Approved’ or ‘Set All Denied’ button to process all of the requests at once.
Approve Telework Tour
Clicking the Approve Telework Tours link on the left navigation area displays the Approve Telework Tours screen. This screen allows you to approve the Tour of Duty changes that contain regular Telework days requested by the employees for whom you are responsible.
Approve Telework Tours screen
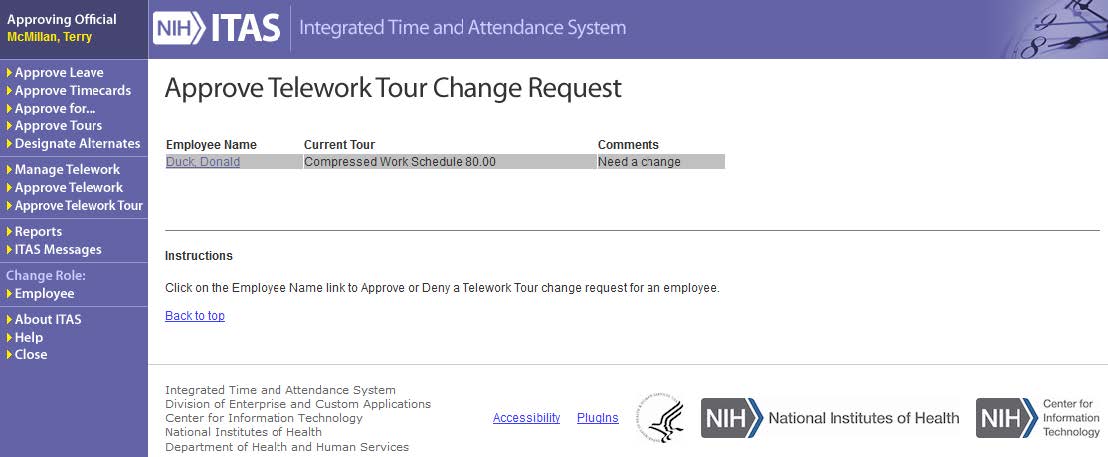
LAO Approve Telework Tour change request screen field descriptions
| Label | Values / Actions | Description |
|---|---|---|
| Employee Name | Link to requested tour of duty. | Displays the requested tour of duty with a pending status. |
| Current Tour | Information Only | Displays employee's current tour of duty. |
| Comments | Information Only | Comments entered by employees concerning the tour of duty change request. |
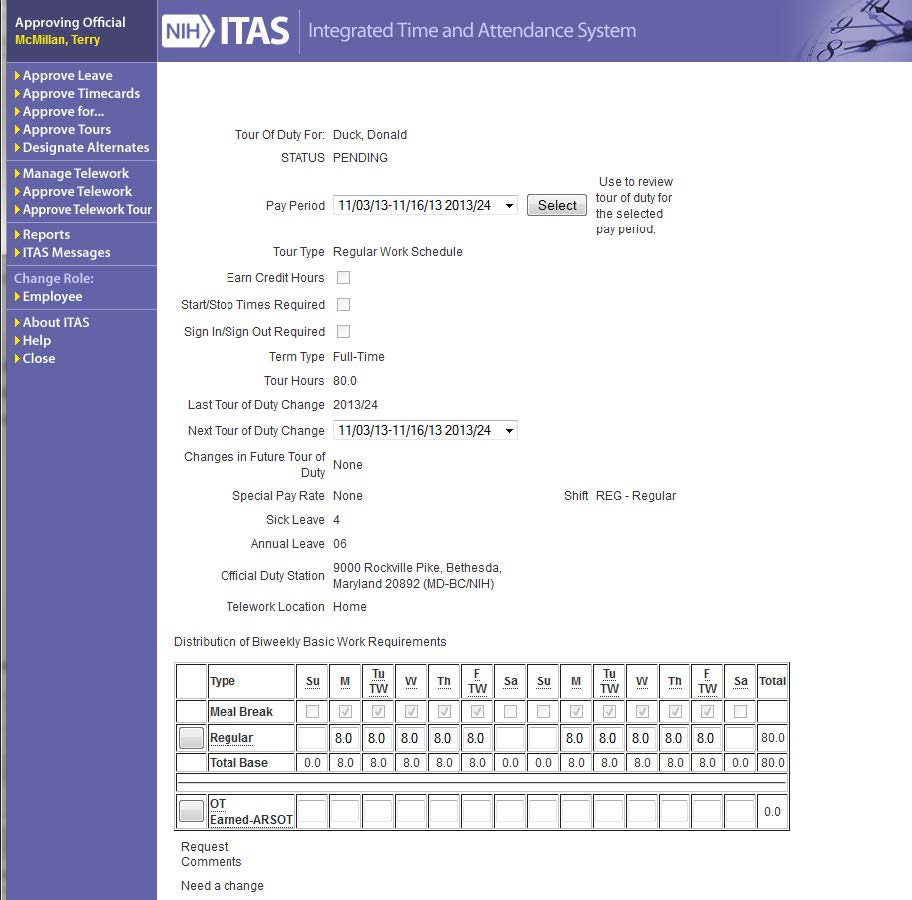
Tour of Duty screen
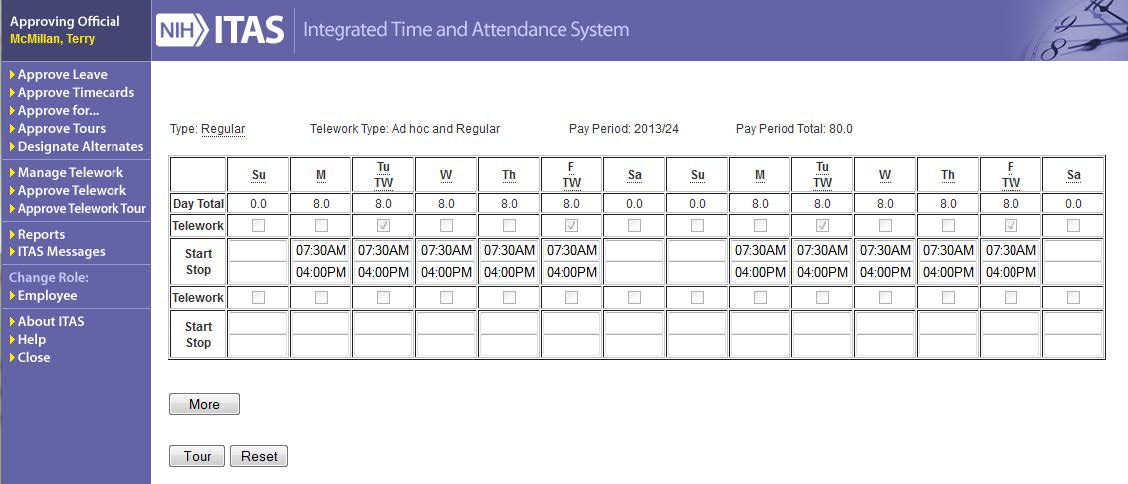
Tour of Duty Regular Hours Details screen with Telework
LAO Pending Telework Tour of Duty Change screen field descriptions
| Label | Values / Actions | Description |
|---|---|---|
| Tour of Duty For | Information Only | Name of Employee |
| STATUS | Information Only | Status of the Tour of Duty change request. |
| Pay Period | Select Pay Period | List of pay periods. |
| Select Button | Click | Displays tour information for the selected pay period. |
| Tour Type | Information Only | Displays the requested tour schedule. |
| Earn Credit Hours | Information Only | Checked if employee is able to earn Credit Hours. |
| Start / Stop Times Required | Information Only | Displays if employee is required to insert Start and Stop times into Timecard as part of the Maxiflex Tour. |
| Sign In / Sign Out Required | Information Only | The check box was intended for use with the Maxiflex Tour Type, but was deemed unnecessary. |
| Term Type | Information Only | Usually Full Time, Part Time, or Intermittent. |
| Tour Hours | Information Only | Displays the number of hours for the selected tour. |
| Last Tour of Duty Change | Information Only | Displays the pay period of the pending change. |
| Next Tour of Duty Change | Select | Displays the pay period to which the requested change will be applied. |
| Changes in Future Tour of Duty | Information Only | Displays the year and pay period of a future scheduled Tour change, if any. |
| Special Pay Rate | Information Only | Usually NONE, valid for certain Tour Types. |
| Shift | Information Only | Usually Regular, valid for certain Tour Types. |
| Sick Leave | Information Only | Displays the number of Sick Leave hours accrued per pay period. |
| Annual Leave | Information Only | Displays the number of Annual Leave hours accrued per pay period. |
| Official Duty Station | Information Only | Official Duty Station location for non-Telework tour days. |
| Telework Location | Information Only | Location where Telework will be performed. (Field will only be displayed if Employee is eligible for Telework.) |
| Distribution of Biweekly Basic Work Requirements Table | ||
|---|---|---|
| Meal Break | Information Only | Indicates whether a meal break is required. |
| (Regular) zoom Button | Click | Shows the Hours Detail screen for the Regular Tour hours. |
| (Regular) Hours | Hours | Displays the number of hours for each type and day. |
| (OT Earned - ARSOT) Button | Click | Displays the Hours Detail screen for the OT Earned - ARSOT hours. |
| (OT - Earned ARSOT) Hours | Hours | Displays the number of hours for each type and day. |
| Request Comments | Information Only | Displays the comments entered by the employee. |
| Comments (Required) | Text Area | Enterable field for comments concerning the approval or denial of tour change request. |
| Approve | Button / Click | Approves the requested tour change. |
| Deny | Button / Click | Approves the requested tour change. |
| Reset | Button / Click | Ignores pending changes and redisplays the screen. |
Note: The type of hours displayed in the Distribution of Biweekly Basic Work Requirements Table is dependent upon the type of employee and tour of duty.
Approve / deny Telework Tour of Duty change request
- Click the Employee Name link to display the Tour Of Duty screen
- Click the Regular hours zoom button to view the hours details for the tour
- Click the Tour button to return to the Tour of Duty screen
- Click the OT – Earned ARSOT hours zoom button to view the hours details for the tour
- Click the Tour button to return to the Tour of Duty screen
- Enter Comments
- Click the Approve or Deny button to process the request
Reports
Clicking the Reports link on the left navigation area displays the Reports screen.
Reports screen
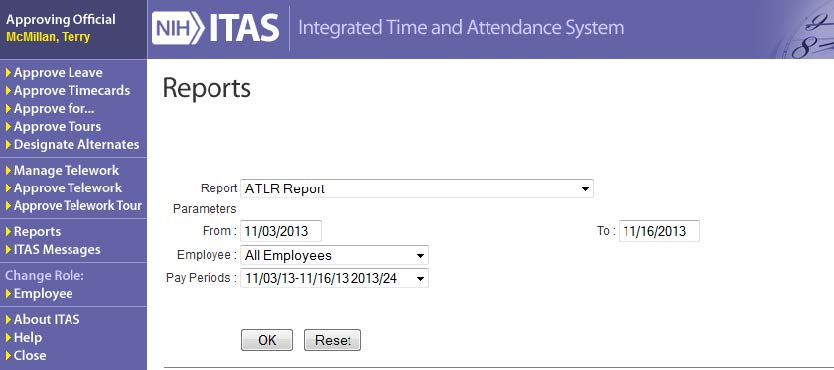
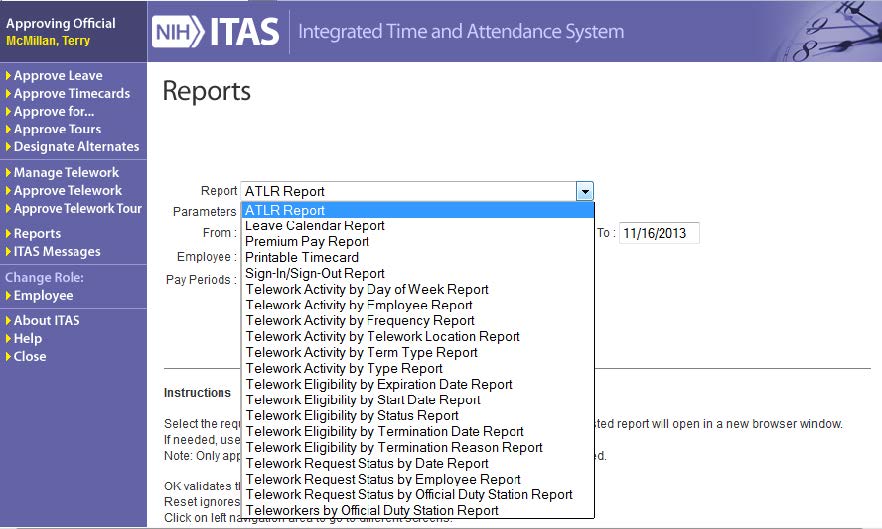
Execute a report
- Select the desired report from the Reports dropdown list
- Enter From and To Dates or select a Pay Period
- Click OK to request the report or Reset to start over
- The requested report is displayed in a new browser window
Note: The required parameters for each report are displayed in the Instructions section of the screen.
Printable Timecard report