Overview
This is a dynamic workflow-based system used for drafting, review, and approval of HR-RAMPS cases (previously known as Pink Folders). The system uses pre-defined case templates to identify the metadata, routing & approval options, and associated documents. Case routing can be modified at the time of initiation by the Initiator. Routing updates allow for addition and deletion of reviewers, re-ordering of review steps, and changing reviewers as well as approvers. Subsequent steps allow metadata and documents updates. Cases can be returned to the Initiator from any step in the workflow and be re-routed as needed.
Document signature templates have been setup for applicable case types. Additional signature documents can be uploaded to the case during the initiation or the review phase. Supporting documents can also be uploaded any time prior to signing.
A ‘Flexible’ case type is available if none of the predefined templates match the routing requirements. When launching this case type, the initiator will need to add or delete reviewers to the routing information section as needed. This case type has all the possible approvers pre-defined and allows for removal of the ones not needed. There are no templates for this workflow, but user can upload a document from their desktop and classify it as a signature template. This case type has been set up with a ‘Prepare for Signatures’ step which lets the Initiator setup the signing fields in the uploaded documents ahead of signing step.
As an Initiator, you are responsible for the following actions:
- Initiating and assembling the case, including all necessary documents
- Acting on any returned cases by reviewers or approvers and resubmitting them for additional action
- Placing signature files for cases where a template is not used, or the document has previously been signed prior to being entered into HR-RAMPS
Initiating An HR-RAMPS Case
- Click on the Menu on the top right-hand corner and select Initiate an HR-RAMPS Workflow

- Select the Division.

- The Case Types available for the division will show up. Select a case type and the rest of the form fields will display.
- The OHR POC is automatically assigned as the logged in user but can easily be changed by clicking on the name. Start typing in the first or last name and select from the resultant dropdown.


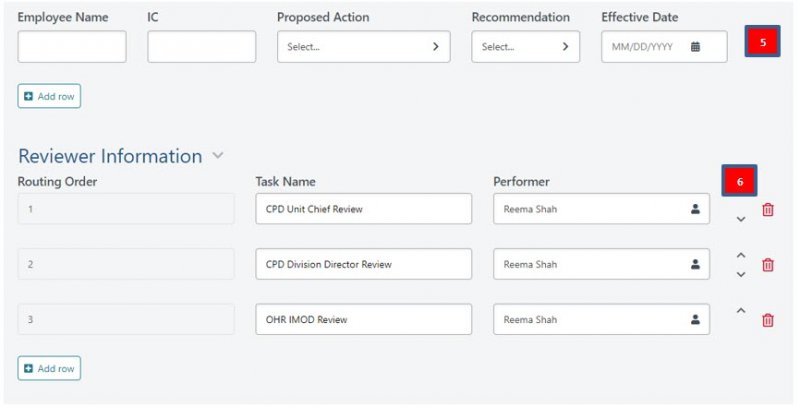
- Metadata fields will show up dependent on the case type. Update the values as needed. If an Employee set is part of the Case Template, you can add up to 20 rows by clicking on the button.
- Reviewer Information is also dependent on the Case Type. You can remove a review step by using or add a new row by using the option. The Performer can also be changed, if needed. The Performer field limits the values to a pre-defined sub-group of users depending on the role.
-
The Approver Information will also show up dependent on the case type. For pre-defined case templates, the Approver steps cannot be deleted.
However, for Flexible cases, all possible Approver steps will show up (shown below) and Approver steps can be deleted by using.

- The documents section will show any templates pre-assigned to the case. The templates have predefined signatures. Cases which do not have pre-defined templates will have a Error! Reference source not found.step to place the signatures in the templates.
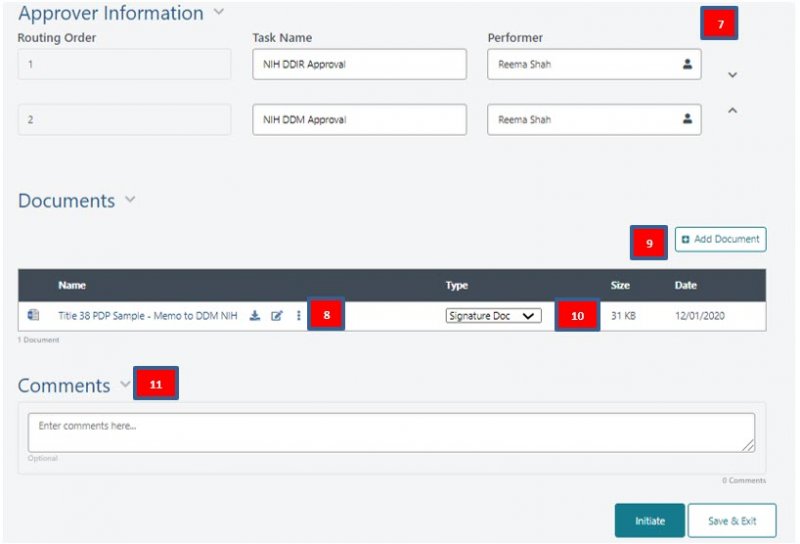
- To add additional documents, click the button. This will open the upload dialog box shown below. Click within the grey area to select a file from your desktop or click and drag a file from your desktop into the area. More than one file can be added at the same time by multiselecting. Once all the files have been dropped, click Ok to upload to the case

- The following options are available for each document:
- Download – Download the file to your desktop.
- Edit – Open the file in the native viewer for editing. Once saved and closed, the file is updated.
- Rename – Renames the file
- Add Version – Used for offline editing of the file. User can download the file and make edits before adding it back to the case using this option.
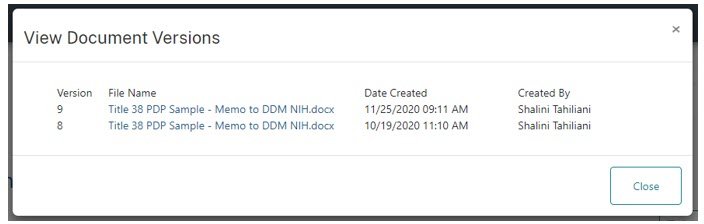
- View Version – Shows all the versions of this file (shown below)
- The Type dropdown contains the values Signature Doc and Supporting Doc.

- Provide any useful comments in the Comment box. These will flow with the workflow through-out the life of the workflow
Returning A Case To The Initiator
- The steps that have been completed by reviewers or approvers are shown with a green checkmark. The workflow below has been reviewed by the Unit Chief and the Division Director.
- The HR-RAMPS cases can be returned by the reviewers or the approvers. The initiator will receive a notification and will be able to re-route to any of the previous reviewers. The example below has been returned by the Division Director. The Initiator has the option to return to the Division Director or re-start the review from the Unit Chief.

Preparing A Case For Signature
- Flexible case types as well as those cases with previously signed documents will need to go to the Prepare for Signatures step after all the reviews have been completed. This step is automatically assigned to the OHR POC who initiated the workflow.

- The Performers in the Approver Information section will show up in the following screen when is clicked. In this case, there are two approvers. Select the first recipient and go down the list as needed.


- Click on the Signature or Date fields from the left navigation menu.
- Drag the field to the appropriate signature location on the document. If there is more than one approver, more than one field can be placed on the document so continue placing the fields until all approvers have signature locations as needed.

- Continue placing any additional fields such as checkboxes, radio buttons, or text fields by selecting the type from the left and placing it in the document.
- Text fields are required by default. Uncheck Required Field on the right side to make it optional.
- The Recipient Preview button lets you preview how the fields will appear to the signer. Be sure to close using the X rather than using the browser back button or all your changes will be lost.

- Change the Viewing As dropdown to see all the recipient views.
- Close Recipient Preview using the X rather than the browser back button.
- Click to send the document to the first approver in the list.

My Assignments Dashboard
- By default results are sorted by Date Assigned. Click on the Column Headings to re-sort.
- Your assignments are hyperlinked in the Current Step. Click on the link to open the assignment.
- The results can be filtered using the search filter field. Enter any of the case data visible in the dashboard, or the data entered into the Brief Summary field on the form to search.

In Process Workflows Dashboard
- Check the status of running workflows using the In-Process Workflows dashboard. The columns Current Step and Current Assignee indicate what step the workflow is in currently and who the assignee is.

- Results can be exported using the button.

- By default, results are sorted by Date Assigned. Click on the Column Headings to re-sort.
- Additional options are available for in-process workflows. Click on the to reveal an action menu. View Summary option, shown below, shows a read-only view of the case. In this view, the case metadata, documents, and comments are available.

The Timeline option shows an audit trail for the workflow.

Completed Workflows Dashboard
- All the completed workflows are available on this tab. The results are sorted by the Date Completed field.

- Results can be exported using the export button.
- Click the button to reveal the additional filters. More than one filter can be applied at the same time to refine the search results. Each filter is a dropdown containing the values from the completed dashboard. Only one value can be selected per filter field.


- To remove a filter, simply click X.
